Sometimes we just want something quick to prepare that still feels satisfying, and that’s when Ham and Cheese Sticks come in handy. They don’t take much effort, and once you’ve rolled a few, the rest goes pretty fast.
They work best as a light afternoon snack or something to share when friends drop by. The mix of cheese and ham makes them filling enough without being heavy, and that’s why I like keeping this recipe in mind. It naturally leads into talking more about what Ham and Cheese Sticks really are.
What is Ham and Cheese Sticks?
Ham and Cheese Sticks are basically small rolls made with lumpia wrappers that hold a strip of cheese and a strip of ham inside. Once they’re wrapped up tightly, they’re fried until the outside turns golden and crisp while the inside stays soft and savory.
They’re usually eaten as a quick snack or appetizer, and they’re common at small gatherings because they’re easy to serve in batches. In many Filipino homes, you’ll see them alongside other street‑style finger foods, but they’re just as good when made at home for an afternoon treat.
Why You’ll Love This Recipe:
- Quick to prepare: You don’t need a lot of time in the kitchen because rolling and frying Ham and Cheese Sticks takes less than an hour, and once you get started, it feels pretty simple.
- Tasty balance: The salty cheese with the slightly sweet ham makes every bite satisfying, and it’s the kind of flavor that works well when you’re craving something filling but not heavy.
- Easy to adjust: You can swap the ham for bacon, hotdog, or even spam, so it’s flexible depending on what you already have at home.
- Great for sharing: Since you can make a big batch, it’s nice to serve these when friends or family come over, and everyone can just grab a piece without fuss.
- Fun to make: Rolling the wrappers feels a bit like a kitchen project, and once you get the hang of sealing them with water, it becomes almost relaxing.
(Personal note: I once tried frying them too quickly, and the wrapper browned before the cheese melted. Keeping the oil at medium heat really made a difference.)
Ingredients Needed:
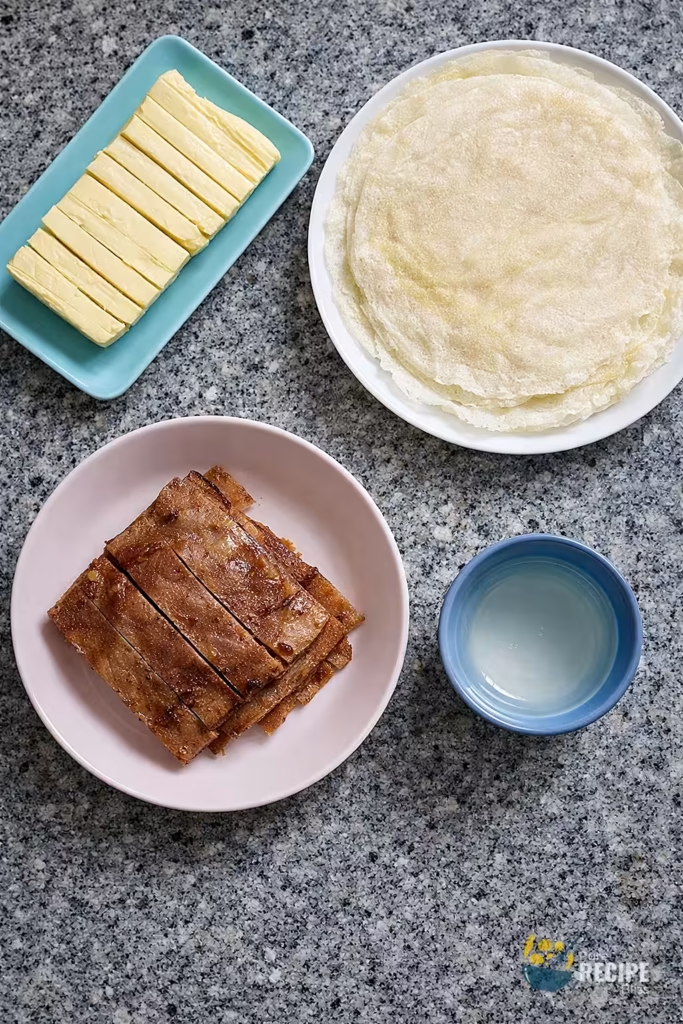
When you make Ham and Cheese Sticks, you really don’t need too many things, and each one has a simple role that makes the recipe come together nicely.
- Cheese strips: This gives the sticks that salty and creamy bite.
- Ham slices: Sweet or honey ham sliced into strips, and this adds the meaty flavor that balances the cheese.
- Lumpia wrappers: These are what hold everything together and fry up crisp.
- Cooking oil: To fry several sticks at once without crowding.
- Water for sealing: This is just for dabbing the edges so the rolls don’t open while frying.
(Personal note: I once tried using less oil to shallow fry, but the sticks didn’t crisp evenly. Using enough oil to cover them halfway really makes a difference.)
💡 Note: For the full ingredient list with exact amounts and measurements, please check the recipe card below.
Step-By-Step Instructions to Make Ham and Cheese Sticks:
One small thing I learned while making Ham and Cheese Sticks at home is that the oil temperature really matters. If it’s too hot, the wrapper browns too quickly and the cheese inside doesn’t melt properly. Keeping the heat steady makes the sticks crisp outside and soft inside.
Step 1: Prepare the wrappers and filling
Lay a lumpia wrapper flat on a clean surface. Place one strip of cheese and one strip of ham in the center. Make sure they’re aligned so the roll cooks evenly.
Step 2: Roll and seal the sticks
Fold the sides of the wrapper inward, then roll tightly until the filling is fully covered. Dab the edge with a little water to seal. If wrappers feel dry, keep them under a damp cloth while working.
Step 3: Heat the oil
Pour cooking oil into a deep pan and let it warm up over medium heat. You’ll know it’s ready when a small piece of wrapper dropped in sizzles right away.
Step 4: Fry the sticks
Place a few rolls at a time into the hot oil. Fry until the wrapper turns golden and crisp, and you can see the cheese softening inside. Don’t overcrowd the pan, or they won’t cook evenly.
Step 5: Drain and serve
Remove the sticks and place them on a plate lined with paper towels. Let them rest for a few minutes so the excess oil drains. Serve warm with mayo-garlic dip or sweet chili sauce.
💡 Note: These steps are just an overview. For detailed quantities, measurements, and exact timings to make this recipe, please check the recipe card below.
Helpful Tips For The Best Results:
- Texture matters: Roll the wrappers tightly so the filling doesn’t leak, but don’t press too hard or the cheese will squeeze out while frying.
- Heat control: Keep the oil at medium heat; too hot and the wrapper burns before the cheese softens, too low and the sticks absorb oil and turn soggy.
- Ingredient swaps: If you don’t have ham, bacon strips or hotdog slices work fine, but avoid thick cuts because they don’t cook evenly inside the wrapper.
- Batch frying: Fry only a few sticks at a time so the oil stays hot and each one crisps properly.
- Wrapper care: Cover unused wrappers with a damp cloth so they don’t dry out and crack while rolling.
(Personal note: I once tried shallow frying with less oil, but the sticks didn’t crisp evenly. Using enough oil to cover them halfway gave the best texture.)
Tasty Variations to Try:
- Cheesy twist: Swap filled cheese for mozzarella if you want that stretchy pull when you bite into the stick.
- Spicy kick: Add a thin slice of jalapeño or a sprinkle of chili flakes with the cheese for extra heat.
- Smoky flavor: Use bacon instead of ham for a deeper, smoky taste that pairs well with garlic dip.
- Vegetarian option: Replace ham with thin strips of bell pepper or mushroom for a lighter version.
- Seasonal idea: Try adding pineapple tidbits with the ham for a sweet‑savory flavor, especially in summer.
- Kid‑friendly: Use mild cheddar and hotdog strips because kids love the familiar taste and softer texture.
(Personal note: I once added pineapple by accident when prepping another dish, and it turned out surprisingly good with the salty cheese.)
Serving Suggestions:

1. When to serve:
Ham and Cheese Sticks are perfect for an afternoon snack when you want something crunchy, or they work well as finger food at small parties where guests can grab them easily.
2. Pairs well with dips:
Serve with mayo‑garlic dip for a creamy taste, or sweet chili sauce if you like a little heat. Both balance the salty cheese and savory ham nicely.
3. Good with drinks:
These sticks pair well with iced tea or a cold soda, and if you’re serving adults, they go surprisingly well with a light beer.
(Personal note: I once served them with gulaman at a family get‑together, and everyone loved the combination of sweet drink with salty snack.)
Storage & Reheating Tips:
- How long it keeps: Ham and Cheese Sticks can stay fresh in the fridge for about three to four days if stored in a sealed container, but they taste best when eaten within the first two days.
- Best storage method: Keep uncooked rolls in a freezer bag and place them in the freezer. They hold well for a few weeks, and you can fry them straight from frozen without thawing.
- Simple reheating advice: Cooked sticks don’t stay crisp if reheated, but if you really need to warm them up, place them in a hot oven for a few minutes instead of using the microwave.
(Personal note: I once tried reheating in the microwave, and the wrapper turned soft and chewy, so the oven method worked much better.)
Frequently Asked Questions (FAQ):
-
Can I substitute the ham?
Yes, you can use bacon, hotdog, or even spam strips instead of ham. Just make sure the pieces are thin so they cook evenly inside the wrapper.
-
Can I make them ahead of time?
You can roll the Ham and Cheese Sticks a day before and keep them in the fridge. Fry them right before serving so they stay crisp.
-
Why are my sticks soggy?
This usually happens if the oil is not hot enough or if too many sticks are fried at once. Keep the heat steady and fry in small batches.
-
Is there a lighter option?
If you want something less meaty, you can replace ham with vegetables like bell peppers or mushrooms. It changes the flavor but still works well.
-
Can I bake instead of fry?
Yes, you can bake them in the oven, but the texture will be less crunchy compared to frying. Brush the wrappers lightly with oil before baking.

Ham and Cheese Sticks
Description
Ham and Cheese Sticks are crisp little rolls filled with salty cheese and savory ham, wrapped in lumpia wrappers and fried until golden. They’re fun to make, satisfying to eat, and versatile enough for family snacks or party platters.
Ingredients
(Optional swaps: 200 g bacon strips, hotdog slices, or spam strips for variation.)
Instructions
- Lay one lumpia wrapper (about 12 cm square) flat on a clean surface.
- Place 1 strip of cheese (12 g) and 1 strip of ham (8 g) in the center of the wrapper.
- Roll tightly, folding the sides inward, and seal the edge with ½ teaspoon water dabbed along the seam.
- Repeat until you’ve used all 64 wrappers, 450 g cheese, and 250 g ham.
- Heat 1 ½ cups cooking oil in a deep frying pan over medium heat.
- Once the oil reaches about 170-175°C (test with a small piece of wrapper like it should sizzle immediately), fry 6-8 sticks at a time.
- Cook for 4-5 minutes until the wrappers turn golden brown and crisp, and the cheese inside begins to soften.
- Remove and place on a plate lined with 2-3 paper towels to absorb excess oil.
- Let rest for 5 minutes before serving.
- Serve warm with 2-3 tablespoons of mayo-garlic dip or sweet chili sauce on the side.
Notes
- If wrappers dry out while rolling, cover the stack with a damp cloth.
- Frying at too high heat will brown the wrapper before the cheese melts. So, keep it at medium.
- Best enjoyed fresh; reheating cooked sticks makes them lose crunch.
Nutrition Facts
Servings 32
Serving Size 1 stick (~32 g)
- Amount Per Serving
- Calories 305kcal
- % Daily Value *
- Total Fat 23g36%
- Sodium 520mg22%
- Total Carbohydrate 18g6%
- Protein 12g24%
- Vitamin A 210 IU
- Vitamin C 1.8 mg
- Calcium 145 mg
- Iron 1.2 mg
- Vitamin D 12 IU
* Percent Daily Values are based on a 2,000‑calorie diet, and your daily needs may be higher or lower depending on your lifestyle. Nutrition information is shared only as a general estimate and may not always be fully accurate. If you follow a special diet or have specific health concerns, it’s best to check with a registered dietitian for personalized guidance.