When I first started making the Indian Masala Omelette, I realized it was one of those dishes that doesn’t need much planning.
It comes together quickly, which makes it handy when I’m short on time but still want something filling. I usually make it in the mornings, but sometimes I’ve even cooked it for a late snack when I didn’t feel like preparing a full meal.
What is Indian Masala Omelette?
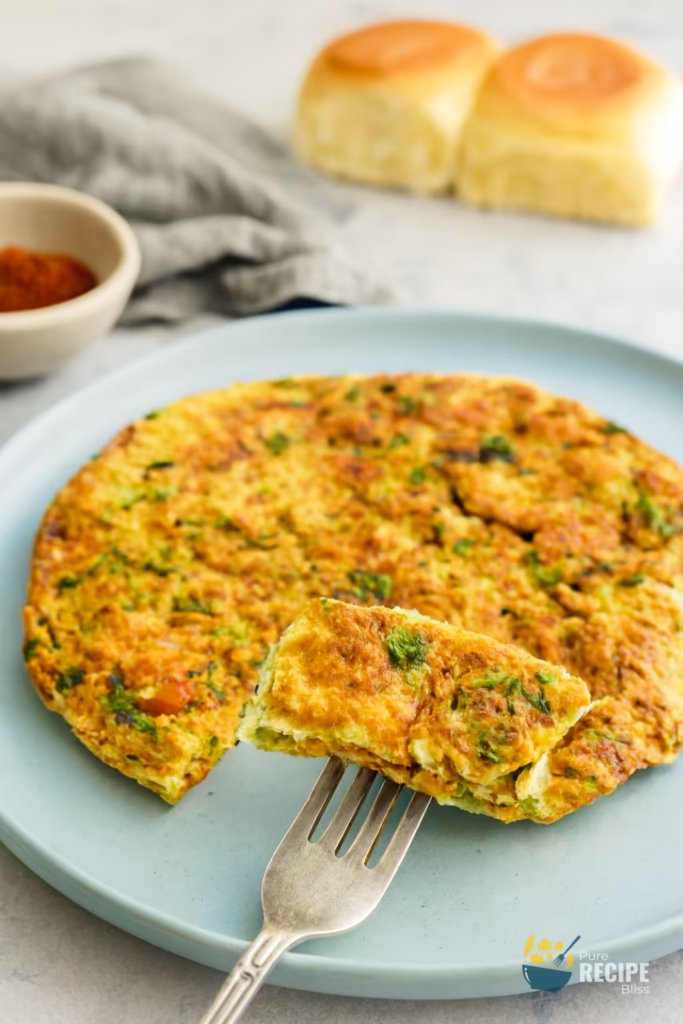
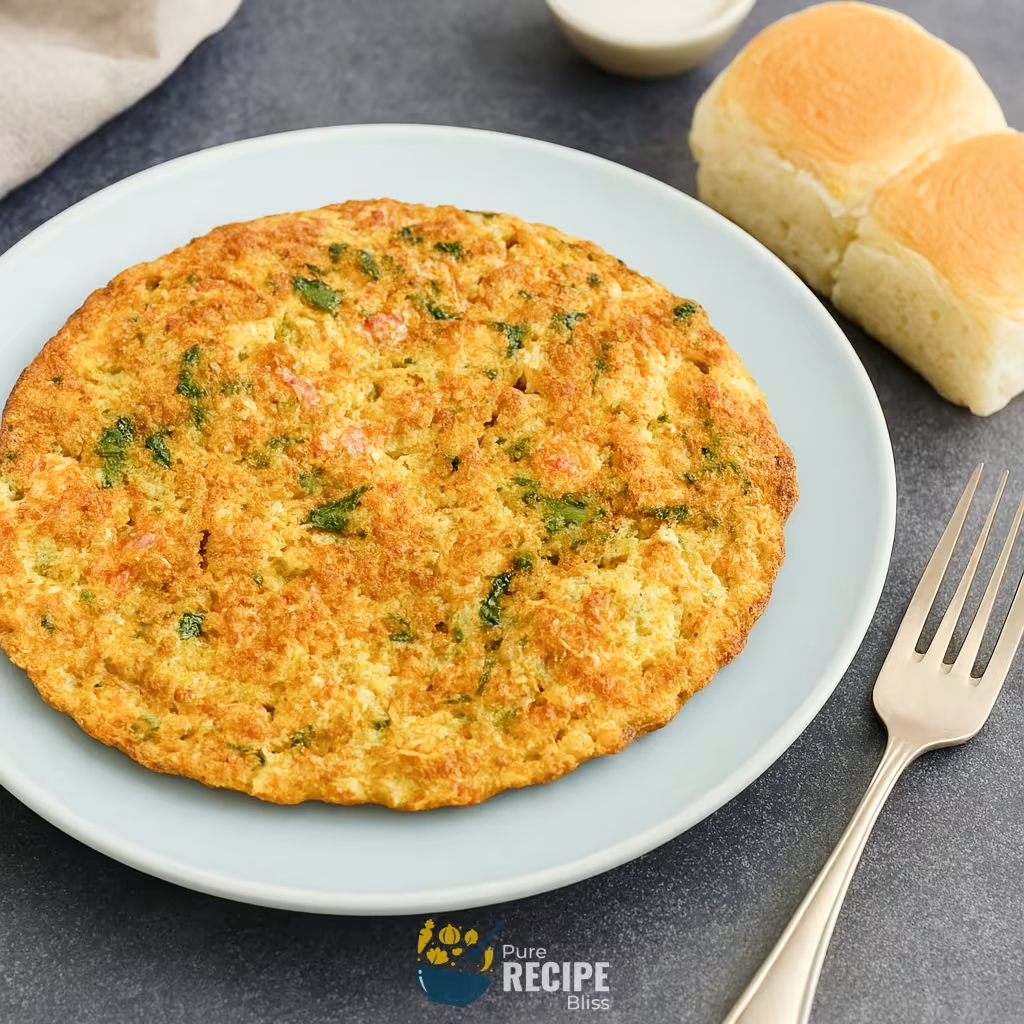
The Indian Masala Omelette is basically an omelette that gets its flavor from a mix of Indian spices and a few fresh vegetables. Instead of just salt and pepper, you add things like chilli powder, garam masala, and turmeric, which give the eggs a nice kick and a deeper taste.
It’s usually eaten hot straight from the pan, and most people pair it with bread, pav, or even rotis (Indian flatbread) depending on what they have at home. In many Indian households, it’s a common breakfast choice, but it also works well as a quick lunch or evening snack when you want something filling without much effort.
Why You’ll Love This Recipe:
- Quick to make: The Indian Masala Omelette doesn’t take long at all, and I usually finish it in under ten minutes, which makes it really convenient when I don’t want to spend too much time cooking.
- Flexible with ingredients: You can add or skip vegetables depending on what you have at home, and sometimes I even change the spice mix a little, so it never feels repetitive.
- Works for different meals: I mostly make it for breakfast, but I’ve also had it for lunch with rotis or as a light evening snack, so it fits into different times of the day.
- Beginner-friendly cooking: Even if someone is new to cooking, this recipe is easy to follow, and the steps are straightforward, so there’s not much that can go wrong.
- Tastes better with small tweaks: I’ve noticed that using a cast iron pan makes the omelette fluffier, and adding just a little cheese on top changes the flavor in a nice way without making it too heavy.
Ingredients Needed:

- Eggs: I usually go with two large eggs for one Indian Masala Omelette, because that amount feels balanced with the vegetables and spices.
- Spices: A small mix of red chilli powder, garam masala, coriander powder, cumin, and turmeric works well. I sometimes adjust the chilli depending on who is eating, since my son prefers it mild.
- Vegetables: Onions, tomatoes, and capsicum are the basics I keep ready. If I have mushrooms or spinach lying around, I add those too, but I make sure not to overload the mix because it can get soggy.
- Green chilli and coriander leaves: These are optional, but I like adding them for extra flavor. If I’m cooking for someone who doesn’t enjoy spice, I skip the chilli but keep the coriander.
- Cheese: A little shredded mozzarella makes the omelette taste richer. I don’t always use it, but when I do, it feels like a small upgrade.
- Oil or butter: I’ve noticed that using enough oil or butter helps the omelette puff up nicely. Once I tried cutting it down too much, and the texture wasn’t the same.
💡 Note: For the full ingredient list with exact amounts and measurements, please check the recipe card below.
Step-By-Step Instructions to Make Indian Masala Omelette:
Before I share the steps, let me tell you one small thing I learned while making this at home. I once tried to cook the omelette on very high heat thinking it would be faster, but it ended up burning on the outside while staying raw inside. So now I always keep the heat at medium, and that gives me a nice fluffy texture without overcooking.
Step 1: Whisk the Eggs with Spices
Start by cracking the eggs into a bowl and whisking them with the spice powders. Keep mixing until the color looks even and the spices don’t sit in clumps. This step makes sure the flavor spreads through the omelette instead of staying in one bite.
Step 2: Add Vegetables and Herbs
Next, add the chopped onions, tomatoes, and capsicum. If you’re using green chilli or coriander leaves, mix them in at this stage. I’ve noticed that too many tomatoes can make the mixture watery, so I usually keep them balanced with the other vegetables.
Step 3: Heat the Pan with Oil or Butter
Place a cast iron skillet on medium heat and spread a little oil or butter. I once tried using very little oil, but the omelette didn’t puff up properly, so now I use enough to coat the surface lightly. The pan should feel warm but not smoking hot.
Step 4: Pour the Egg Mixture and Add Cheese
Pour the mixture into the skillet and let it spread naturally. Sprinkle cheese on top before the eggs start setting. Cover the pan for a short while so the cheese melts and the bottom firms up. You’ll know it’s ready to flip when the edges look set and the cheese looks gooey.
Step 5: Flip and Cook the Other Side
Carefully flip the omelette to cook the other side. I’ve broken a few in the past by rushing this step, so now I use a wide spatula and take my time. Cook until the surface looks golden and the omelette feels firm but still soft inside.
Step 6: Serve Hot
Once cooked, slide the omelette onto a plate and serve it right away. I usually pair it with pav or rotis, but even plain toast works fine. The omelette tastes best when eaten fresh, while the cheese is still melty and the spices are fragrant.
💡 Note: These steps are just an overview. For detailed quantities, measurements, and exact timings to make this recipe, please check the recipe card below.
Helpful Tips For The Best Results:
- Heat control: Keep the pan on medium heat because too high will burn the outside while leaving the inside raw, and too low will make the omelette dense instead of fluffy.
- Texture balance: Don’t overload with watery vegetables like tomatoes. I usually keep them in smaller amounts compared to onions and capsicum, otherwise the omelette can break apart.
- Oil or butter use: Use enough to lightly coat the pan. I once tried cutting down too much, and the omelette stuck and lost its puffiness.
- Ingredient swaps: If you don’t have mozzarella, even a small sprinkle of cheddar or processed cheese works fine. If you don’t want cheese at all, just skip it like the spices carry the flavor well.
- Pan choice: A cast iron skillet gives the best fluff, but if you don’t have one, use a smaller non-stick pan so the mixture doesn’t spread too thin.
Tasty Variations to Try:
- Extra spicy version: Add more green chilli or a pinch of black pepper if you like stronger heat.
- Cheese-free option: Skip cheese completely for a lighter version, which I sometimes do when I want something less heavy.
- Spinach or mushroom add-in: Toss in sautéed spinach or mushrooms for a seasonal twist. Just cook them lightly first so they don’t release water into the eggs.
- Chaat masala topping: Sprinkle a little chaat masala after cooking for a tangy flavor that changes the taste completely.
- Bread roll style: Place the Indian Masala Omelette inside pav or sandwich bread to make it feel more like street food.
- Kid-friendly version: Keep only eggs, spices, and cheese, and skip the vegetables if you’re making it for someone who doesn’t enjoy them.
Serving Suggestions:
1. Breakfast plate:
Serve the Indian Masala Omelette with toasted bread or ladi pav. It feels filling but still light enough to start the day without feeling heavy.
2. Lunch option:
Pair the omelette with rotis and a small salad. This works well when you want something quick but still balanced for the afternoon.
3. Snack idea:
Fold the omelette inside pav or sandwich bread. It becomes easy to hold and feels more like street-style comfort food.
4. Dinner side:
Use the omelette as a side dish along with dal (lentil curry) and rice. It adds variety and makes the meal more satisfying.
Storage & Reheating Tips:
- How long it keeps: The Indian Masala Omelette is best eaten fresh, but if you really need to store it, you can keep it in the fridge for about a day. I don’t go beyond that because the texture changes quickly.
- Best storage method: Place the omelette in an airtight container once it cools down. If you store it while still warm, condensation makes it soggy, so I always wait a few minutes before packing it.
- Simple reheating advice: Reheat gently in a skillet on low heat. This keeps the omelette soft and prevents it from turning rubbery. I avoid microwaving because it usually makes the eggs tough and uneven.
Frequently Asked Questions (FAQ):
-
Can I substitute the vegetables?
Yes, you can swap onions or capsicum with mushrooms or spinach. I usually sauté them first so they don’t release too much water into the Indian Masala Omelette.
-
Can I make it ahead of time?
I don’t recommend making it fully ahead because eggs taste best fresh. But you can chop the vegetables and keep them ready in the fridge, which saves time when cooking later.
-
Why does my omelette turn rubbery?
This usually happens if the heat is too high or if it’s reheated in the microwave. I keep the heat medium while cooking and reheat gently in a skillet if needed.
-
Is cheese necessary?
No, the spices carry enough flavor. I add cheese sometimes for variety, but skipping it makes the dish lighter and still tasty.
-
Can it be made for a low-oil diet?
Yes, but don’t cut the oil completely. I’ve tried reducing it too much, and the omelette lost its fluff. A small amount is enough to keep the texture right.
Indian Masala Omelette
Description
The Indian Masala Omelette is a quick and flavorful egg dish cooked with spices, vegetables, and a touch of cheese. It’s fluffy, filling, and versatile enough to enjoy with bread, pav, or Indian flatbread.
Ingredients
Instructions
- Crack 2 large eggs into a mixing bowl. Add ¼ teaspoon salt, ¼ teaspoon red chilli powder, ¼ teaspoon garam masala powder, ¼ teaspoon coriander powder, ⅛ teaspoon cumin powder, and ⅛ teaspoon turmeric powder. Whisk until the mixture looks smooth and evenly colored.
- Stir in 2 tablespoons chopped tomatoes, 1 tablespoon chopped onions, and 1 tablespoon chopped capsicum. If you like extra flavor, add ½ chopped green chilli and a handful of chopped coriander leaves. Mix gently so the vegetables spread evenly.
- Heat ½ tablespoon oil or butter in a cast iron skillet over medium heat. Pour the egg mixture into the pan and let it spread naturally.
- Sprinkle 1-2 tablespoons shredded mozzarella cheese on top before the eggs begin to set. Cover the skillet and cook until the bottom firms up and the cheese melts.
- Flip the omelette carefully using a wide spatula. Add the remaining ½ tablespoon oil or butter around the edges. Cook until the second side turns golden and the omelette feels firm but still soft inside.
- Slide the omelette onto a plate and serve hot with bread, pav, or rotis.
Notes
- Don’t overload with watery vegetables like tomatoes; balance them with onions and capsicum.
- Use medium heat for fluffiness; high heat can burn the omelette.
- Cheese is optional, but even a small sprinkle makes the flavor richer.
Nutrition Facts
Servings 1
Serving Size 1 omelette
- Amount Per Serving
- Calories 273kcal
- % Daily Value *
- Total Fat 20g31%
- Saturated Fat 9g45%
- Trans Fat 1g
- Cholesterol 384mg128%
- Sodium 943mg40%
- Potassium 264mg8%
- Total Carbohydrate 6g2%
- Dietary Fiber 2g8%
- Sugars 3g
- Protein 17g34%
- Vitamin A 861 IU
- Vitamin C 14 mg
- Calcium 152 mg
- Iron 3 mg
- Vitamin D 41 IU
* Percent Daily Values are based on a 2,000‑calorie diet, and your daily needs may be higher or lower depending on your lifestyle. Nutrition information is shared only as a general estimate and may not always be fully accurate. If you follow a special diet or have specific health concerns, it’s best to check with a registered dietitian for personalized guidance.