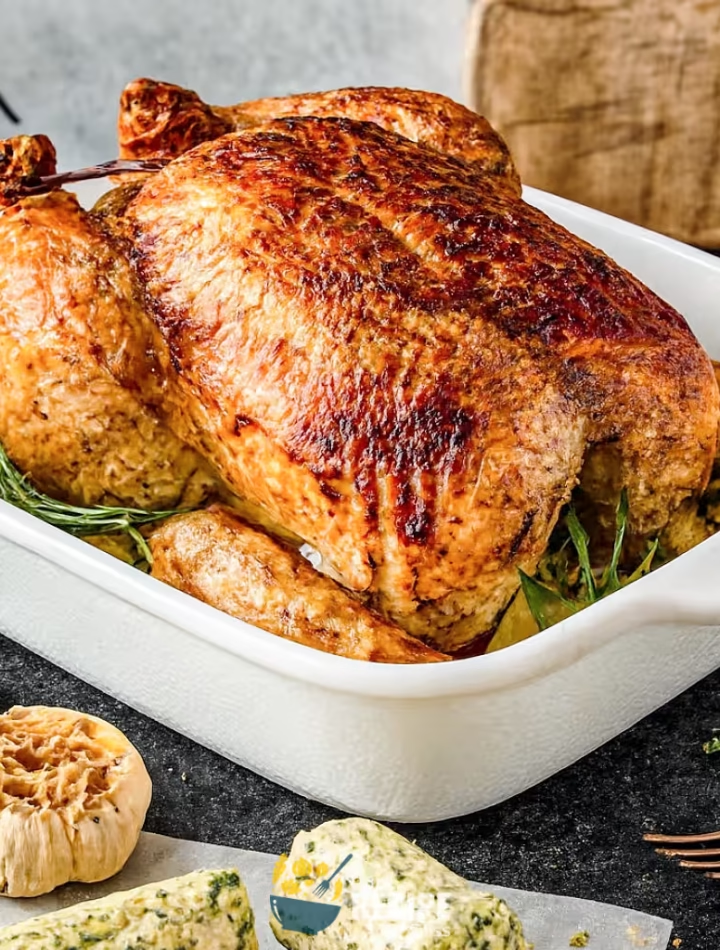
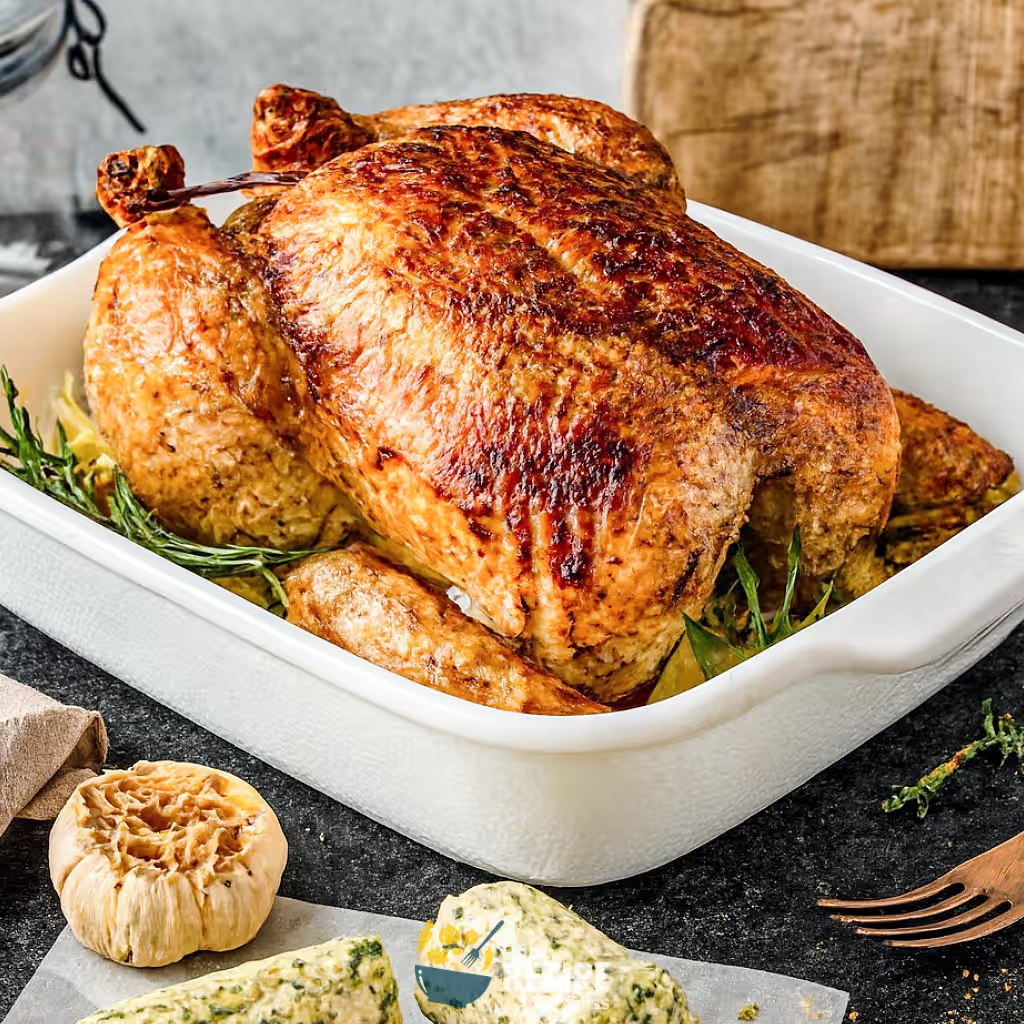
Sometimes it feels nice to cook something that looks a little more impressive without being overly complicated, and that’s exactly what Garlic and Herb Roasted Chicken does. It’s one of those meals that feels like a treat when you bring it to the table, but it doesn’t require fancy skills to get right.
It works best for dinner when you want something filling and cozy, and the good part is that the leftovers can easily carry into the next day. So, it’s not just about one meal, it’s about stretching it into more than one.
What is Garlic and Herb Roasted Chicken?
Garlic and Herb Roasted Chicken is basically a whole chicken that’s seasoned with a mix of garlic, fresh herbs, and butter, then roasted until the skin turns golden and crisp. It’s not complicated, but it does feel a little more special than just cooking chicken pieces because you get the whole bird on the table.
Most of the time, people serve it as a main dish for dinner, usually with sides like roasted vegetables, rice, or even bread to soak up the juices. It’s also one of those meals that can stretch into the next day since the leftover chicken works well in sandwiches, salads, or soups.
In terms of context, this style of roasted chicken is pretty common in home kitchens because it’s versatile and comforting. It’s not tied to one culture specifically, but the garlic and herb flavor combination is something you’ll see in a lot of Western-style cooking.
Why You’ll Love This Recipe:
- Easy to prepare: Even though it’s a whole chicken, the steps are pretty straightforward once you get going, and most of the work is just seasoning and letting the oven do its job.
- Great flavor payoff: The garlic and herb butter makes the meat taste richer and more savory, and it also helps the skin crisp up nicely, which is something I noticed really makes a difference compared to plain roasting.
- Works for dinner and beyond: It’s best served as a main dish for dinner, but the leftovers are flexible like I’ve used them in sandwiches, tossed them into salads, and even added them to soups when I didn’t feel like cooking from scratch again.
- Customizable to taste: You can adjust the herbs or add a squeeze of lemon if you like a bit more brightness. I once tried skipping the lemon, and while it was fine, I found that the little bit of acidity actually balances the richness better.
- Reliable results: As long as you check the internal temperature, it’s hard to mess this up. I learned the hard way that cutting too soon makes the juices run out, so now I always let it rest before carving, and it keeps the meat moist.
Ingredients Needed:
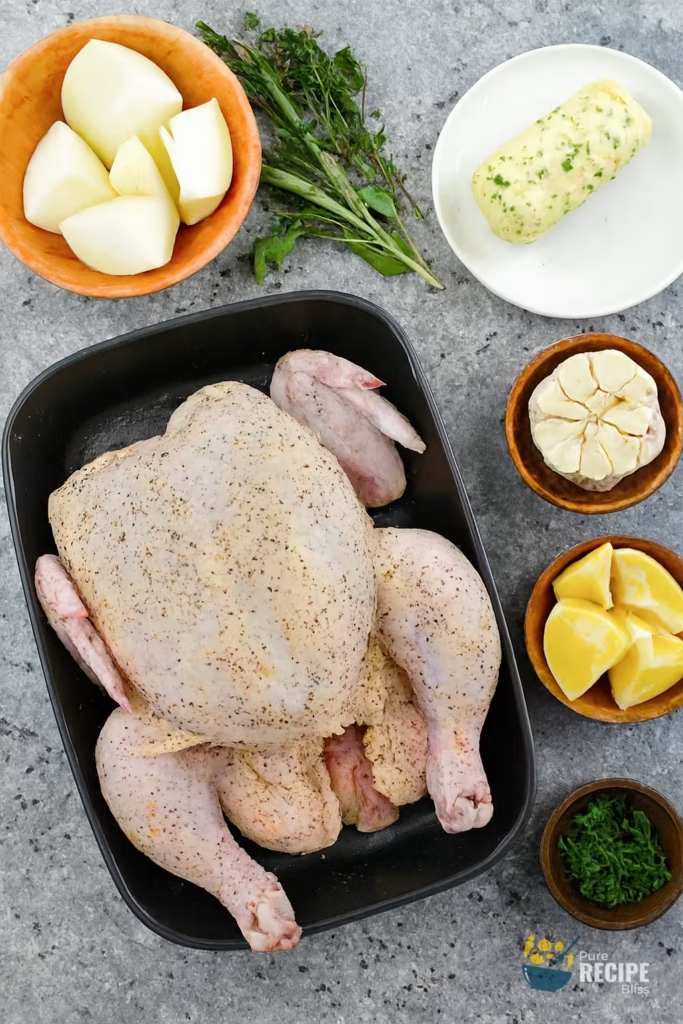
- Whole chicken: You’ll want a bird that’s around 5-6 pounds because it cooks more evenly and gives enough meat for leftovers. I once tried a smaller one, and it dried out faster, so I stick with this size now.
- Garlic and herb butter: This is the main flavor booster. Mixing roasted garlic with butter and herbs makes the meat taste richer, and it also helps the skin crisp up. I usually make the butter the day before so the flavors settle in better.
- Fresh herbs: Rosemary, thyme, and sage are the usual picks, but you can swap or add others if you like. I’ve tried adding chives once, and it gave a fresher taste that worked really well.
- Onion and lemon: These go inside the chicken to add moisture and a bit of brightness. I noticed that skipping the lemon makes the flavor heavier, so I usually keep it in.
- Salt and pepper: Seasoning is key here. Mixing them together before rubbing under the skin makes it easier to cover the whole bird evenly.
- Optional extras: If you have leftover butter, you can spoon it over the chicken while roasting. I’ve done this a few times, and it adds a nice extra layer of flavor.
💡 Note: For the full ingredient list with exact amounts and measurements, please check the recipe card below.
Step-By-Step Instructions to Make Garlic and Herb Roasted Chicken:
I learned a thing while making this recipe at home is that separating the skin from the meat gently with my fingers makes a huge difference. The butter spreads more evenly, and the flavor really gets into the chicken. The first time I rushed it, I tore the skin, and it didn’t hold the butter well, so now I always take my time with that part.
Step 1: Prep the chicken
Start by patting the chicken dry with paper towels because removing extra moisture helps the skin crisp up later. Then, gently slide your fingers under the skin to loosen it from the meat. It feels a little strange at first, but this step is important because that’s where the butter will go.
Step 2: Season under the skin
Mix salt and pepper together and rub it under the skin so the seasoning touches the meat directly. After that, spread the garlic herb butter underneath in as even a layer as you can manage. Don’t worry if it’s not perfect because the butter melts and spreads during roasting.
Step 3: Rest in the fridge
Place the chicken uncovered in the fridge overnight. This step helps the skin dry out, which means it will crisp up better in the oven. I once skipped this because I was short on time, and the skin ended up chewy instead of crisp, so now I always plan ahead.
Step 4: Stuff and tie
Before roasting, fill the cavity with onion, garlic, lemon, and herbs. Then tuck the wings back and tie the legs with kitchen twine. This keeps the shape neat and helps the chicken cook more evenly.
Step 5: Roast and rotate
Start roasting at a higher heat to get the skin going, then lower the temperature so the inside cooks through without drying out. Moving the pan around in the oven helps the chicken brown evenly. I noticed that when I left it in one spot, one side browned more than the other, so rotating really does make a difference.
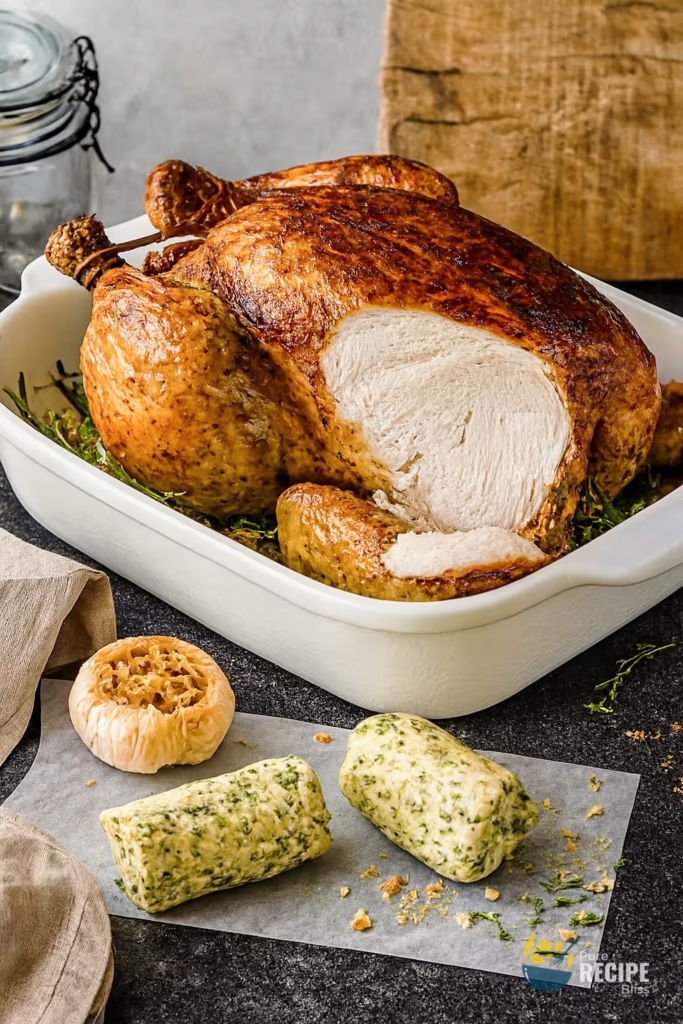
Step 6: Rest before carving
Once the chicken reaches the right internal temperature, take it out and let it sit for about 15-20 minutes. This pause keeps the juices inside the meat instead of spilling out when you cut it. I used to carve too soon, and the meat ended up dry, so now I always wait.
💡 Note: These steps are just an overview. For detailed quantities, measurements, and exact timings to make this recipe, please check the recipe card below.
Helpful Tips For The Best Results:
- Texture matters: Make sure the chicken skin is really dry before you add the butter. I once skipped this step, and the skin turned out rubbery instead of crisp. Patting it dry and letting it rest uncovered in the fridge makes a big difference.
- Heat control: Start roasting at a higher temperature to get the skin going, then lower it so the inside cooks through without drying out. If you notice the skin browning too quickly, loosely cover it with foil instead of lowering the heat too much.
- Ingredient swaps: If you don’t have fresh herbs, dried ones can work, but use less since they’re stronger. I’ve tried swapping lemon with lime once, and it gave a sharper flavor that was still good.
- Resting is key: Don’t carve the chicken right away. Waiting at least 15 minutes helps the juices stay inside the meat. I learned this after cutting too soon and ending up with dry slices.
Tasty Variations to Try:
- Garlic-heavy version: Add extra raw garlic to the butter if you want a stronger flavor. It’s bold, but it works if you love garlic.
- Citrus twist: Swap lemon for orange or lime to change the brightness. Orange gives a sweeter note, while lime adds sharpness.
- Herb swap: Try parsley or dill instead of rosemary and sage. I once used dill, and it gave the chicken a lighter, fresher taste.
- Spicy option: Mix chili flakes or paprika into the butter for a bit of heat. It’s nice if you want something less traditional.
- Seasonal idea: In colder months, add a pinch of nutmeg or cinnamon to the butter for a cozy flavor. It sounds unusual, but it pairs surprisingly well with roasted chicken.
Serving Suggestions:
1. Dinner centerpiece:
Garlic and Herb Roasted Chicken works best as the main dish for dinner, especially when you want something filling and comforting. Serve with roasted vegetables or mashed potatoes to round out the meal.
2. Pairs with fresh sides:
It goes really well with lighter sides like a crisp salad or steamed greens. The freshness balances the richness of the chicken and makes the plate feel complete.
3. Leftover ideas:
The next day, shred the chicken and use it in sandwiches or wraps. It’s also easy to toss into soups or pasta for a quick lunch.
Storage & Reheating Tips:
- How long it keeps: Garlic and Herb Roasted Chicken usually stays good in the fridge for about three days. I’ve noticed that after that, the flavor starts to fade and the texture isn’t as nice.
- Best storage method: Store the chicken in an airtight container or wrap it tightly in foil. Keeping it sealed helps prevent the meat from drying out and also keeps the fridge from smelling like garlic.
- Simple reheating advice: Warm it up in the oven at a low temperature so the skin stays crisp. If you use the microwave, cover it with a damp paper towel to keep the meat from drying out too much.
Frequently Asked Questions (FAQ):
-
Can I use different herbs?
Yes, you can swap rosemary, thyme, or sage with parsley or dill. I’ve tried dill once, and it gave the chicken a lighter flavor that worked surprisingly well.
-
Can I prepare it ahead of time?
You can season and butter the chicken the night before, then keep it uncovered in the fridge. This actually helps the skin dry out and makes it crispier when roasted.
-
What if the skin doesn’t get crispy?
Usually, it means the chicken wasn’t dry enough before roasting. Pat it well with paper towels and give it fridge time uncovered. That step really makes a difference.
-
Is this recipe gluten-free?
Yes, Garlic and Herb Roasted Chicken itself is naturally gluten-free. Just make sure any sides or sauces you serve with it don’t contain flour unless you use a gluten-free option.
-
Can I skip the lemon?
You can, but I’ve noticed the flavor feels heavier without it. A little citrus balances the richness, so I usually keep it in.
Garlic and Herb Roasted Chicken
Description
Garlic and Herb Roasted Chicken is a whole chicken seasoned with roasted garlic, butter, and fresh herbs, then cooked until the skin is golden and crisp. It’s hearty enough for dinner and versatile enough to use leftovers in sandwiches, soups, or salads.
Ingredients
Instructions
- Roast 1 bulb garlic with a drizzle of olive oil, a pinch of salt, and pepper wrapped in foil until soft. Mash with 8 tbsp softened butter and ⅓ cup chopped chives to make compound butter.
- Pat 5-6 lb whole chicken dry with paper towels, gently loosen skin with fingers or spatula, and rub 2 tbsp kosher salt mixed with 2 tsp black pepper under the skin.
- Spread about 6-8 tbsp garlic herb butter under the skin across breasts, thighs, and legs. Place chicken uncovered in fridge overnight to dry brine.
- Before roasting, stuff cavity with 1 medium onion (quartered), 1 medium lemon (quartered), and sprigs of rosemary, thyme, and sage. Tuck wings back and tie legs with kitchen twine.
- Preheat oven to high heat, place chicken in roasting pan, and roast until skin begins to brown. Lower heat and continue roasting until internal temperature reaches 165°F.
- Rotate pan halfway through cooking for even browning.
- Remove chicken from oven and let rest 15-20 minutes before carving.
Notes
- If skin browns too quickly, tent loosely with foil.
- Leftover compound butter can be melted and spooned over chicken during roasting.
- Always check internal temperature with a meat thermometer for safe cooking.
Nutrition Facts
Servings 6
Serving Size 1 portion of chicken with skin and aromatics
- Amount Per Serving
- Calories 557kcal
- % Daily Value *
- Total Fat 21g33%
- Total Carbohydrate 51g17%
- Protein 39g78%
- Vitamin A 450 IU
- Vitamin C 6 mg
- Calcium 60 mg
- Iron 3 mg
- Vitamin D 20 IU
* Percent Daily Values are based on a 2,000‑calorie diet, and your daily needs may be higher or lower depending on your lifestyle. Nutrition information is shared only as a general estimate and may not always be fully accurate. If you follow a special diet or have specific health concerns, it’s best to check with a registered dietitian for personalized guidance.