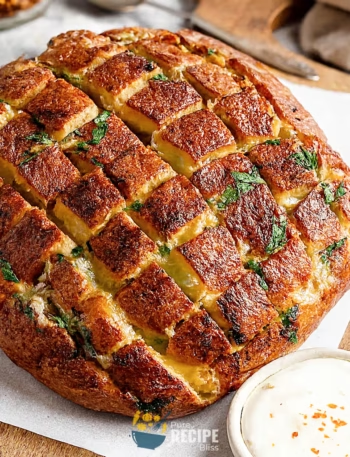
The Rustic Garlic Parmesan Herb Bread is basically a homemade loaf that has garlic, parmesan, and herbs mixed right into the dough, so it feels a little bit like garlic bread but in a full loaf form. The nice thing is that it doesn’t take too much effort, and once you get the dough rising, most of the time is just waiting, so it feels pretty easy overall.
I think this bread works well when you want something to go with lunch or dinner, especially if you’re serving soup or salad, but honestly it can also be sliced up for a snack when you just want something savory. It’s warm, it’s cozy, and it’s the kind of bread that makes the kitchen smell really good while it bakes. And that’s why I thought we could talk about what exactly Rustic Garlic Parmesan Herb Bread is in the next part.
What is Garlic Parmesan Herb Bread?
So, Rustic Garlic Parmesan Herb Bread is basically a homemade loaf that has garlic, parmesan cheese, and dried herbs mixed right into the dough. It’s not like regular garlic bread where you spread butter and garlic on top after baking. Instead, all the flavors are baked inside, so every slice has that savory taste. The butter added on top before baking melts down and gives the crust a rustic look with a soft, buttery finish.
Most people enjoy this bread as a side with soups, pasta, or salads, but it can also be eaten on its own because the flavor is strong enough. It feels a little bit like the kind of bread you’d see at a bakery, but it’s made at home. That’s why it’s often served at lunch or dinner, especially when you want something cozy and filling.
Why You’ll Love This Recipe:
- Quick prep: The actual hands-on time is short, because most of the waiting is just letting the dough rise, so you don’t feel stuck in the kitchen the whole time.
- Everyday ingredients: You only need basic things like flour, yeast, garlic, and parmesan, which are usually already at home, so there’s no need to shop for anything special.
- Easy shaping: The dough is forgiving, so even if the loaves don’t look perfect, they still bake up nicely, and I found that a rustic look makes it even better.
- Flexible flavor: You can swap herbs or add a little chili if you want more heat, so it’s simple to adjust based on what you like.
- Works for meals: I noticed it pairs well with soups or pasta at dinner, but it also makes a nice snack when sliced with a bit of butter.
- Beginner-friendly: Even if you haven’t baked bread before, the steps are straightforward, and I learned that small mistakes like adding a little extra flour don’t ruin the bread.
That’s why I think this recipe feels approachable and useful, and it gives you bread that looks and tastes like something from a bakery without being complicated.

Ingredients Needed:
I’ll just explain the main ones and what they actually do in the recipe.
- Yeast – this is what makes the dough rise and gives the bread its soft texture.
- Sugar – it helps the yeast activate and gives a little balance to the flavor.
- Warm water – this is needed to wake up the yeast and bring the dough together.
- Salt – it adds flavor and also keeps the yeast from working too fast.
- Dried herbs – these give the bread its savory taste and make it smell really good while baking.
- Garlic – this is the main flavor, and it spreads through the whole loaf.
- Flour – this is the base that forms the dough and structure of the bread.
- Parmesan cheese – it adds a nutty, salty flavor that mixes well with the garlic.
- Olive oil – it keeps the bread from sticking and adds a little richness.
- Butter – this melts on top while baking and makes the crust look rustic and taste buttery.
One small note from my own try: I noticed that freshly grated parmesan blends better than the pre-grated kind, so if you have the time, it’s worth grating it yourself.
💡 Note: For the full ingredient list with exact amounts and measurements, please check the recipe card below.
Step-By-Step Instructions to Make Garlic Parmesan Herb Bread:
When I first tried making Rustic Garlic Parmesan Herb Bread at home, I realized one small thing that helped a lot. The dough feels different depending on how slowly you add the flour. If I rushed it, the bread turned out heavy, but when I added flour gradually, the texture stayed soft and light. That’s why I always remind myself to go slow at that stage.
Step 1: Mixing Yeast and Warm Water
Start by combining the yeast with warm water and a little sugar. The water should feel like a warm bath, not too hot, because if it’s too hot the yeast won’t work properly. You’ll notice small bubbles forming, which is a sign the yeast is active. I usually wait until I see that foamy layer before moving on, because it makes me feel sure the bread will rise well.
Step 2: Adding Garlic, Herbs, and Salt
Next, stir in the minced garlic, dried herbs, and salt. This is the stage where the smell starts to come through, and it already feels like the bread will taste flavorful. I try to mix the garlic evenly so it doesn’t sit in one spot, because once I had a loaf with one slice full of garlic and another slice with almost none.
Step 3: Working in Flour and Parmesan
Add flour slowly, along with parmesan cheese. The dough should feel tacky but not sticky, so I usually stop adding flour once I can press it lightly without it sticking to my fingers. Parmesan blends into the dough and gives little specks of flavor. I found that freshly grated parmesan melts better than pre-grated, so I prefer using that.
Step 4: Kneading the Dough
Knead the dough until it feels elastic. I like to test it by stretching a small piece like if it stretches thin without tearing, it’s ready. Kneading by hand takes a bit of effort, but I think it helps me feel the dough better. If it’s too sticky, I just add a tiny bit more flour, but I avoid adding too much because that makes the bread dense.
Step 5: First Rise
Place the dough in a greased bowl and cover it. The dough should double in size, and when you press it lightly with a finger, the dent should stay. I once left it too long and the dough collapsed, so now I keep an eye on it. The rise gives the bread its airy texture.
Step 6: Shaping the Loaves
Divide the dough into two portions and shape them into round loaves. I don’t worry about making them perfectly smooth, because the rustic cracks look nice after baking. Place them on a baking sheet with olive oil underneath, which adds flavor and keeps them from sticking.
Step 7: Second Rise and Butter Topping
Let the shaped loaves rise again for a short time, then place a small piece of butter on top of each. The butter melts down as the bread bakes, giving the crust a golden look and a soft finish. I noticed that this step makes the bread smell even better while baking.
Step 8: Baking the Bread
Bake until the loaves are golden brown and sound hollow when tapped on the bottom. The crust should look slightly cracked with melted butter marks. I always let the bread cool on a wire rack before slicing, because cutting too early makes the inside gummy.
💡 Note: These steps are just an overview. For detailed quantities, measurements, and exact timings to make this recipe, please check the recipe card below.
Helpful Tips For The Best Results:
- Texture check: The dough should feel soft and tacky but not sticky. If it sticks too much to your fingers, add flour slowly, but don’t dump in too much at once because that makes the bread heavy.
- Heat control: Make sure the water feels like a warm bath, not hot. If it’s too hot, the yeast won’t rise properly, and the bread will stay flat.
- Garlic placement: Mix the garlic well into the dough so it doesn’t sit on the surface, because garlic burns quickly if exposed while baking.
- Cheese choice: Freshly grated parmesan blends better than pre-grated, and it gives a smoother flavor throughout the loaf.
- Swap option: If you don’t have olive oil, you can use melted butter for greasing, but it changes the flavor slightly and makes the crust softer.
Tasty Variations to Try:
- Herb swap: Try thyme or sage instead of rosemary for a different flavor profile.
- Cheese change: Use cheddar or mozzarella instead of parmesan if you want a stronger or creamier taste.
- Spicy twist: Add a pinch of chili flakes or black pepper to give the bread a little heat.
- Whole wheat option: Replace part of the flour with whole wheat flour for a nuttier flavor and a denser texture.
- Seasonal idea: In colder months, fold in roasted garlic for a sweeter, mellow flavor, while in summer you can add fresh chopped basil for brightness.
- Dairy-free choice: Skip the butter topping and use olive oil instead, which still gives a nice crust but keeps it plant-based.
Serving Suggestions:

So, when you think about how to serve Rustic Garlic Parmesan Herb Bread, it really depends on the meal and what you’re pairing it with. I’ll keep it simple and just share a few clear ideas.
1. Serve with soups:
This bread works well with tomato soup, creamy broccoli, or even chicken soup, because the garlic and herbs soak up the broth nicely.
2. Perfect for pasta:
I like slicing it alongside spaghetti or lasagna, since the parmesan flavor matches the sauce.
3. Pairs well with salads:
A fresh green salad or even a Caprese salad feels more filling when you add a slice of this bread.
4. Snack option:
Sometimes I just toast a slice, spread a little butter, and eat it as a quick savory snack.
That way, you can use it for different meals without much planning.
Storage & Reheating Tips:
- How long it keeps: The bread usually stays good for about three days at room temperature, but after that the crust starts to lose its texture.
- Best storage method: I always let it cool fully, then place it in a sealed bag or airtight box, because storing while warm makes the crust soggy.
- Simple reheating advice: When I want to warm it up, I wrap slices in foil and put them in the oven for a few minutes. I avoid the microwave because it makes the bread chewy instead of soft.
Frequently Asked Questions (FAQ):
-
Can I substitute fresh herbs for dried ones?
Yes, you can, but you’ll need more fresh herbs since they are less concentrated. I usually triple the amount when I switch.
-
Can I make the dough ahead of time?
Yes, you can prepare the dough and keep it in the fridge overnight. Just let it come back to room temperature before baking.
-
Why does my bread feel too dense?
This usually happens if too much flour is added too quickly. I learned to add flour slowly and stop when the dough feels tacky but not sticky.
-
Is there a way to make it lighter for dietary needs?
You can swap part of the flour with whole wheat or use less cheese, but keep in mind the flavor will change slightly.

Garlic Parmesan Herb Bread
Description
Rustic Garlic Parmesan Herb Bread is a homemade artisan-style loaf baked with garlic, parmesan, and dried herbs right in the dough. It’s soft inside, golden outside, and topped with butter for a rustic crust. Perfect for serving with soups, pasta, or salads, and simple enough to bake at home without special equipment.
Ingredients
Instructions
- In a large bowl, combine 1 tablespoon instant dry yeast, 1 tablespoon granulated sugar, and 1 cup warm water (100–110°F / 38–43°C). Stir until dissolved and foamy.
- Mix in 1 teaspoon salt, 2 teaspoons dried rosemary, 1 teaspoon dried basil, 1 teaspoon dried oregano, and 6 cloves minced garlic. Stir well so the flavors spread evenly.
- Add 2 cups all-purpose flour and 1/3 cup grated parmesan cheese. Stir until dough begins to form. Gradually add up to 1/2 cup more flour until dough is tacky but not sticky.
- Knead dough on a lightly floured surface for about 5-7 minutes until smooth and elastic.
- Transfer dough to a greased bowl, cover, and let rise for about 1 hour or until doubled in size.
- Preheat oven to 375°F (190°C). Drizzle 2 tablespoons olive oil on a baking sheet.
- Divide dough into 2 equal portions, shape into round loaves, and place on the prepared sheet. Cover and let rise for 15-20 minutes.
- Place 1/2 tablespoon butter on top of each loaf.
- Bake for 18-20 minutes until golden brown and hollow-sounding when tapped.
- Cool on a wire rack before slicing.
Notes
- Add flour slowly at the end to avoid dense bread.
- Freshly grated parmesan blends better than pre-grated.
- Garlic should be mixed evenly into dough to prevent burning.
Nutrition Facts
Servings 8
Serving Size 1/4 loaf
- Amount Per Serving
- Calories 215kcal
- % Daily Value *
- Total Fat 7g11%
- Saturated Fat 2g10%
- Cholesterol 7mg3%
- Sodium 370mg16%
- Potassium 61mg2%
- Total Carbohydrate 33g11%
- Dietary Fiber 1g4%
- Sugars 2g
- Protein 6g12%
- Vitamin A 80 IU
- Vitamin C 0.7 mg
- Calcium 63 mg
- Iron 2.1 mg
* Percent Daily Values are based on a 2,000‑calorie diet, and your daily needs may be higher or lower depending on your lifestyle. Nutrition information is shared only as a general estimate and may not always be fully accurate. If you follow a special diet or have specific health concerns, it’s best to check with a registered dietitian for personalized guidance.