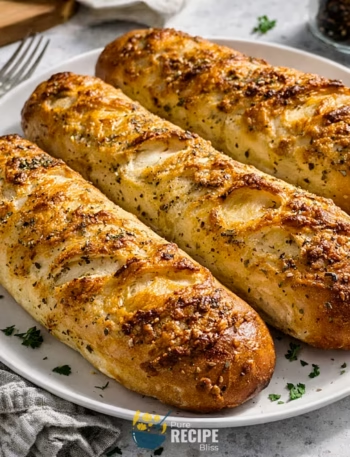
I’ve been baking Garlic Parmesan Herb Bread lately, and it’s one of those recipes that feels rewarding without being complicated. The dough comes together in a short amount of time, and the baking part is quick enough that you don’t have to plan your whole day around it.
It’s the kind of bread I like to serve when I want something warm on the table, whether it’s alongside dinner or just sliced up for a snack. The smell of garlic and herbs fills the kitchen, and it makes the bread feel special even though the process is simple. That’s why I keep coming back to it, and it leads right into talking about what Garlic Parmesan Herb Bread actually is.
What is Garlic Parmesan Herb Bread?
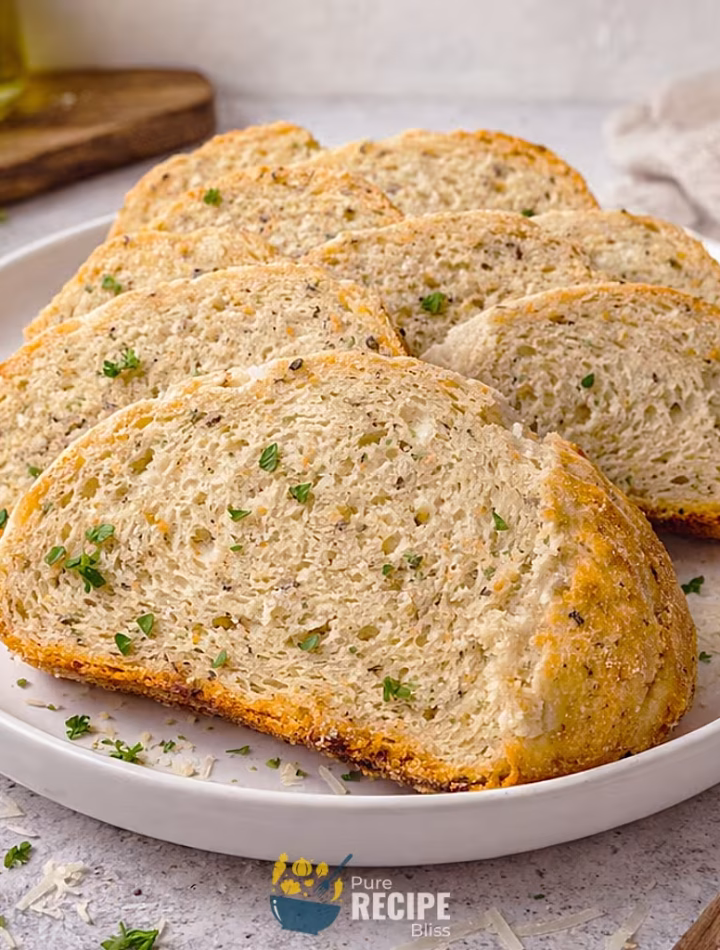
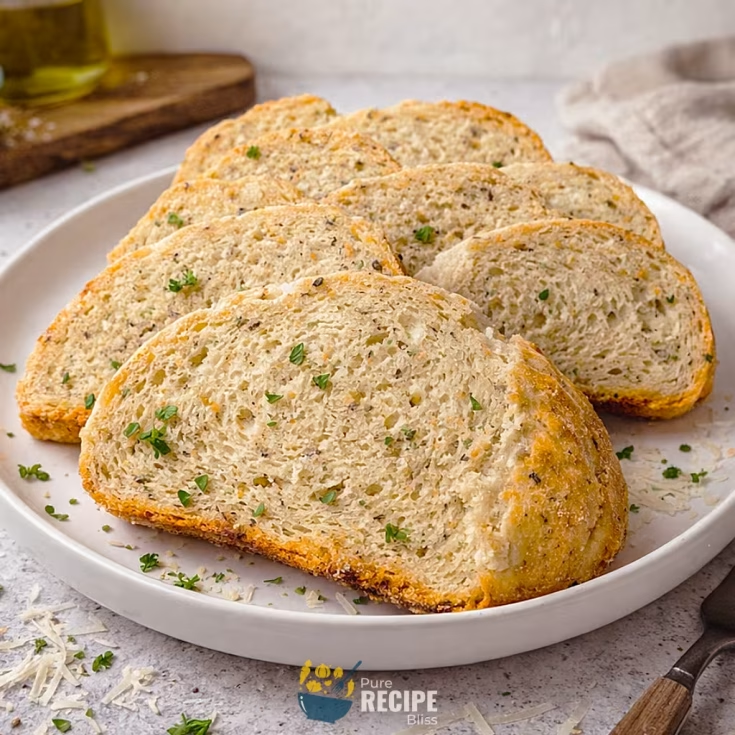
Garlic Parmesan Herb Bread is basically a homemade loaf that takes the idea of garlic bread and turns it into something you can slice and serve like regular bread. The garlic, herbs, and parmesan are mixed right into the dough, so the flavor runs through the whole loaf instead of just sitting on top.
It’s usually eaten as a side with meals like soups, pasta, or salads, but I’ve also just cut a piece and had it with butter when I wanted a quick snack. The texture is soft inside with a slightly crisp crust, and that combination makes it feel a little more special than plain bread.
Some people think of it as an “artisan‑style” bread because of the way it looks and tastes, but the process is straightforward enough that you can make it at home without much fuss.
Why You’ll Love This Recipe:
- Easy to put together: The dough doesn’t take long to mix, and you don’t need fancy tools. I’ve made it by hand with just a bowl and spoon, and it still turned out great.
- Flavor in every bite: Since the garlic, herbs, and parmesan are mixed right into the dough, you don’t just taste it on the crust — the flavor runs through the whole loaf.
- Works for different meals: I’ve served it with soup at lunch, sliced it for dinner, and even had a piece as a quick snack. It fits in easily no matter the time of day.
- Beginner‑friendly process: Even if you’re not used to baking bread, the steps are straightforward. I once worried about kneading too little, but the bread still came out soft and tasty.
- Customizable to taste: You can add more garlic if you like it stronger, or swap herbs depending on what you have. I’ve tried extra rosemary once, and it gave the bread a nice earthy flavor.
- Smells amazing while baking: The aroma of garlic and herbs fills the kitchen, and honestly, that’s half the reason I enjoy making it. It makes the whole place feel cozy.
Ingredients Needed:

I’ll just explain the main ones and what they actually do in the recipe.
- Yeast: You’ll need instant yeast, and I usually go with this because it saves time. If you only have active dry yeast, it works too, but the rising takes a little longer.
- Warm water: The water should feel like a warm bath, not hot. I once made the mistake of using water that was too warm, and the yeast didn’t work properly.
- Sugar and salt: A small amount of sugar helps the yeast get started, and the salt balances the flavor.
- Herbs: Dried rosemary, basil, and oregano give the bread its flavor. I’ve tried fresh herbs before, but I had to use more, and the taste was stronger.
- Garlic: Fresh minced garlic makes a big difference. I once used garlic powder when I was out of cloves, and while it worked, the flavor wasn’t as bold.
- Flour: All‑purpose flour is fine here. I usually add it slowly until the dough feels tacky but not sticky.
- Parmesan cheese: Grated parmesan mixes into the dough and adds flavor. Freshly grated gives a sharper taste, but pre‑grated works if that’s what you have.
- Olive oil: This keeps the bread from sticking and adds a little richness.
- Butter: A small piece on top of each loaf melts during baking and gives the crust a rustic look. I’ve skipped it once, and the bread looked plain, so I always add it now.
💡 Note: For the full ingredient list with exact amounts and measurements, please check the recipe card below.
Step-By-Step Instructions to Make Garlic Parmesan Herb Bread:
One small thing I learned while making this bread at home is that the dough feels different every time depending on the weather or how much flour I add. So instead of worrying about exact numbers, I go by touch and look, and that has made the process much easier.
Step 1: Mix the base
Start by combining the yeast, sugar, and warm water in a large bowl. Stir gently until it looks dissolved and slightly foamy. This is when I usually check the water temperature with my hand — if it feels like a warm bath, it’s good.
Step 2: Add flavor
Next, stir in the salt, herbs, and garlic. I like to mince the garlic finely so it spreads evenly. The mixture should smell fragrant at this point, and that’s always my cue that the flavors are going to carry through the bread.
Step 3: Work in flour and cheese
Add flour slowly along with the parmesan. I usually stop when the dough feels tacky but doesn’t stick to my fingers. If it’s too sticky, I sprinkle in a little more flour. The parmesan blends in and gives the dough a slightly speckled look.
Step 4: Let it rise
Transfer the dough to a greased bowl, cover it, and let it rest until it looks puffed up and doubled. I’ve noticed that if the room is cooler, it takes longer, so sometimes I place the bowl near the oven while it preheats.
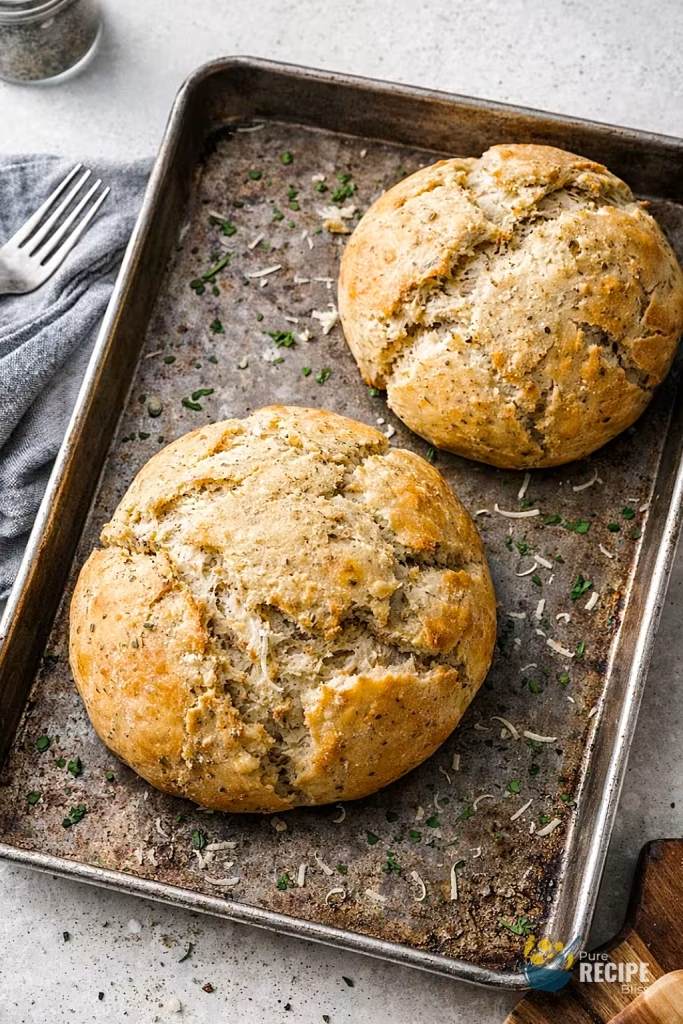
Step 5: Shape the loaves
Once risen, divide the dough into two portions and shape them into round loaves. Place them on an oiled baking sheet. I usually cover them again for a short rest so they puff up a little more before baking.
Step 6: Add butter topping
Put a small piece of butter on top of each loaf. As it melts in the oven, it creates a rustic cracked crust. I once skipped this step, and the bread looked plain, so now I always add it.
Step 7: Bake until golden
Bake until the loaves turn golden brown and sound hollow when tapped underneath. The smell of garlic and herbs fills the kitchen, and that’s my favorite part of the process.
💡 Note: These steps are just an overview. For detailed quantities, measurements, and exact timings to make this recipe, please check the recipe card below.
Helpful Tips For The Best Results:
- Texture check: Add flour slowly and stop when the dough feels tacky but not sticky. I once added too much flour at once, and the bread turned out dense.
- Heat control: If your kitchen is cold, place the dough near a warm oven or wrap the bowl in a towel. This helps the dough rise more evenly.
- Garlic swap: Fresh garlic gives stronger flavor, but garlic powder works if you’re short on time. I’ve tried both, and the fresh version always feels more aromatic.
- Cheese choice: Parmesan is classic, but I’ve swapped in pecorino once, and it gave a sharper taste.
- Butter tip: Don’t skip the butter on top. It melts into the crust and makes the bread look rustic.
Tasty Variations to Try:
- Extra cheesy: Add shredded mozzarella along with parmesan for a gooey texture inside the loaf.
- Herb swap: Try thyme or sage instead of rosemary and basil. I once used thyme, and it gave a lighter, fresher flavor.
- Whole wheat option: Replace part of the flour with whole wheat flour for a nuttier taste. The bread will be denser, but still tasty.
- Spicy twist: Mix in a pinch of chili flakes with the herbs. It adds a gentle heat that pairs well with garlic.
- Seasonal idea: In colder months, I like adding a bit of dried parsley for color. In summer, fresh basil works well for a brighter flavor.
- Olive upgrade: Brush the loaves with garlic‑infused olive oil before baking for an extra layer of flavor.
Serving Suggestions:
So, when you think about how to serve Garlic Parmesan Herb Bread, it really depends on the meal and what you’re pairing it with. I’ll keep it simple and just share a few clear ideas.
1. Serve with soups:
Garlic Parmesan Herb Bread pairs well with creamy soups like broccoli or tomato, since the bread soaks up the broth nicely.
2. Perfect for pasta nights:
Slice it alongside spaghetti or lasagna, and it works almost like garlic bread but in loaf form.
3. Pairs well with salads:
A fresh green salad or even a Caprese salad balances the richness of the bread.
4. Snack option:
I’ve warmed up a slice with butter for a quick bite, and it feels satisfying without being heavy.
5. Breakfast idea:
Toasted with scrambled eggs or an omelet, it adds flavor without needing extra seasoning.
Storage & Reheating Tips:
- How long it keeps: Garlic Parmesan Herb Bread usually stays fresh for a couple of days at room temperature. I’ve noticed that after the third day, the crust softens and the flavor isn’t as strong.
- Best storage method: Once the bread cools completely, I place it in a resealable bag or airtight container. If it’s still warm when stored, condensation can make the crust soggy, so I always wait until it’s cool.
- Simple reheating advice: To bring back the crisp crust, I warm slices in the oven for a few minutes. If I’m in a hurry, I use the toaster, but the oven gives better texture.
Frequently Asked Questions (FAQ):
-
Can I substitute the garlic?
Yes, you can use garlic powder if you don’t have fresh cloves. I’ve tried it before, and while the flavor is lighter, it still works fine.
-
Can I make Garlic Parmesan Herb Bread ahead of time?
You can prepare the dough earlier in the day and let it rise slowly in the fridge. I’ve done this when I wanted fresh bread ready for dinner.
-
Why is my bread too dense?
Usually, it’s from adding too much flour or not letting the dough rise long enough. I learned to add flour slowly and check the texture by touch.
-
Is there a way to make it lighter for dietary needs?
You can swap part of the flour with whole wheat or use less cheese. It changes the texture a bit, but the bread still tastes good.
-
Can I freeze it?
Yes, once cooled, wrap the loaf tightly and freeze. I reheat slices in the oven, and they come back with a nice crust.
Garlic Parmesan Herb Bread
This Garlic Parmesan Herb Bread is a rustic loaf that mixes garlic, herbs, and parmesan right into the dough. It’s simple to make, gives you two golden loaves, and works well with soups, pasta, or even just sliced warm with butter.
Ingredients
- 1 tablespoon granulated sugar
- 1 cup warm water (100–110°F)
- 1 tablespoon instant dry yeast
- 1 teaspoon salt
- 2 teaspoons dried rosemary
- 1 teaspoon dried basil
- 1 teaspoon dried oregano
- 6 cloves garlic, minced
- ⅓ cup grated parmesan cheese
- 2 to 2½ cups all‑purpose flour
- 2 tablespoons olive oil
- 1 tablespoon butter
Instructions
- In a large bowl, dissolve 1 tablespoon yeast and 1 tablespoon sugar in 1 cup warm water until foamy.
- Stir in 1 teaspoon salt, 6 minced garlic cloves, 2 teaspoons rosemary, 1 teaspoon basil, and 1 teaspoon oregano until evenly mixed.
- Add 2 cups flour and ⅓ cup parmesan cheese, mixing until dough forms. Add more flour gradually until dough feels tacky but not sticky.
- Place dough in a greased bowl, cover, and let rise for about 1 hour until doubled in size.
- Preheat oven to 375°F (190°C). Drizzle a baking sheet with 2 tablespoons olive oil.
- Divide dough into two portions, shape into loaves, and place on the baking sheet. Cover and let rise again for 15-20 minutes.
- Place ½ tablespoon butter on top of each loaf.
- Bake for 18-20 minutes until golden brown and hollow when tapped underneath.
- Cool loaves on a wire rack before slicing.
Notes
Nutrition Information
Yield 8 Serving Size 1 slice (¼ loaf)Amount Per Serving Calories 215Total Fat 7gSaturated Fat 2gUnsaturated Fat 5gCholesterol 7mgSodium 370mgCarbohydrates 33gNet Carbohydrates 32gFiber 1gSugar 2gProtein 6g
Percent Daily Values are based on a 2,000‑calorie diet, and your daily needs may be higher or lower depending on your lifestyle. Nutrition information is shared only as a general estimate and may not always be fully accurate. If you follow a special diet or have specific health concerns, it’s best to check with a registered dietitian for personalized guidance.