You know how sometimes you just want something cheesy and comforting without spending too much time cooking? That’s exactly why I like making Cheesy Garlic Bread. It doesn’t take long at all, and you can have it ready while the rest of dinner is still finishing up.
It’s the kind of recipe that works when you’re putting together a quick family meal or even when you just want a snack to share. It’s simple to prepare, but it still feels special once it comes out of the oven. Next, let’s look at what Cheesy Garlic Bread actually is.
What is Creamy Cheesy Garlic Bread?
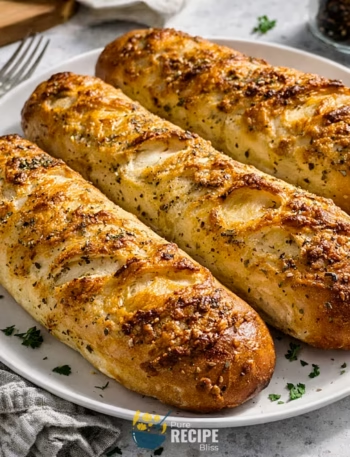
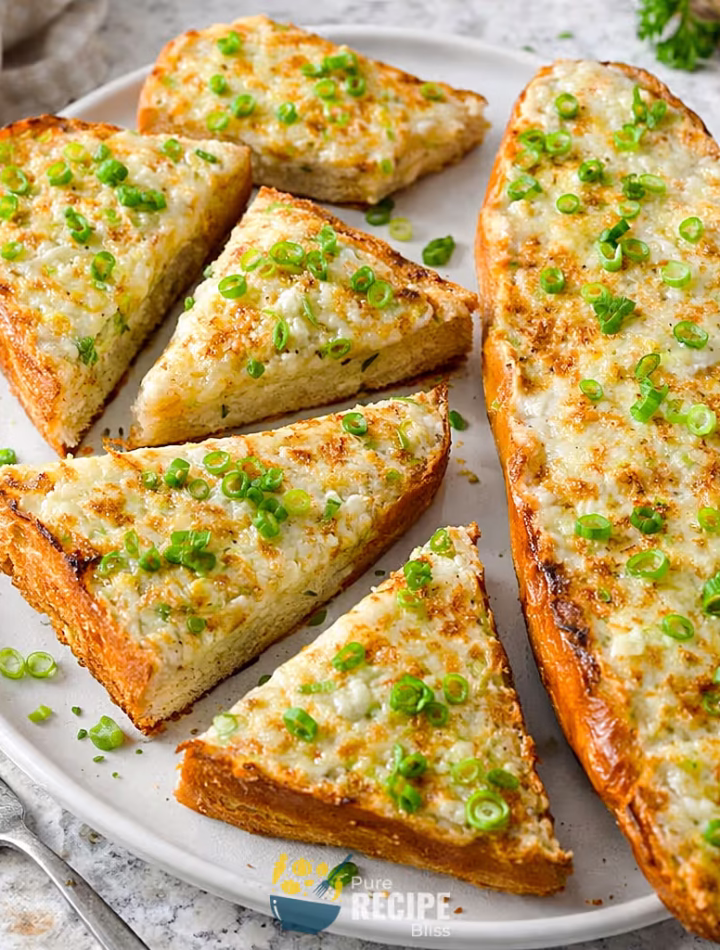
Cheesy Garlic Bread is basically a loaf of bread that’s sliced open and covered with a mixture of butter, garlic, cheese, and in this version, mayonnaise. The mayo makes the topping extra creamy and helps the cheese melt smoothly instead of drying out.
It’s usually served as a side dish with pasta, soups, or even alongside salads, but honestly, it can also be enjoyed on its own as a snack. In many homes, garlic bread is a go‑to comfort food, and adding cheese just makes it more filling and satisfying. This version is a little different because of the mayo, but it still keeps that familiar garlic bread vibe everyone loves.
Why You’ll Love This Recipe:
- Quick to bake: The bread only needs a short time in the oven, so you can have it ready while the rest of dinner is still cooking.
- Creamy texture: The mayonnaise in the mix makes the topping smoother and helps the cheese melt evenly, which gives every bite a soft and rich feel.
- Easy to adjust: You can add more garlic if you like it stronger or swap cheeses if you prefer a different flavor, so it’s flexible for different tastes.
- Family‑friendly: It’s the kind of side dish that everyone at the table usually enjoys, even people who don’t normally eat garlic bread.
- Pairs with many meals: It works well with pasta, soups, or even as a snack on its own, so you don’t have to plan too much around it.
- Home‑tested tip: I once spread the mixture too thin and the bread turned out dry, so now I always make sure to cover it generously from edge to edge.
Ingredients Needed:
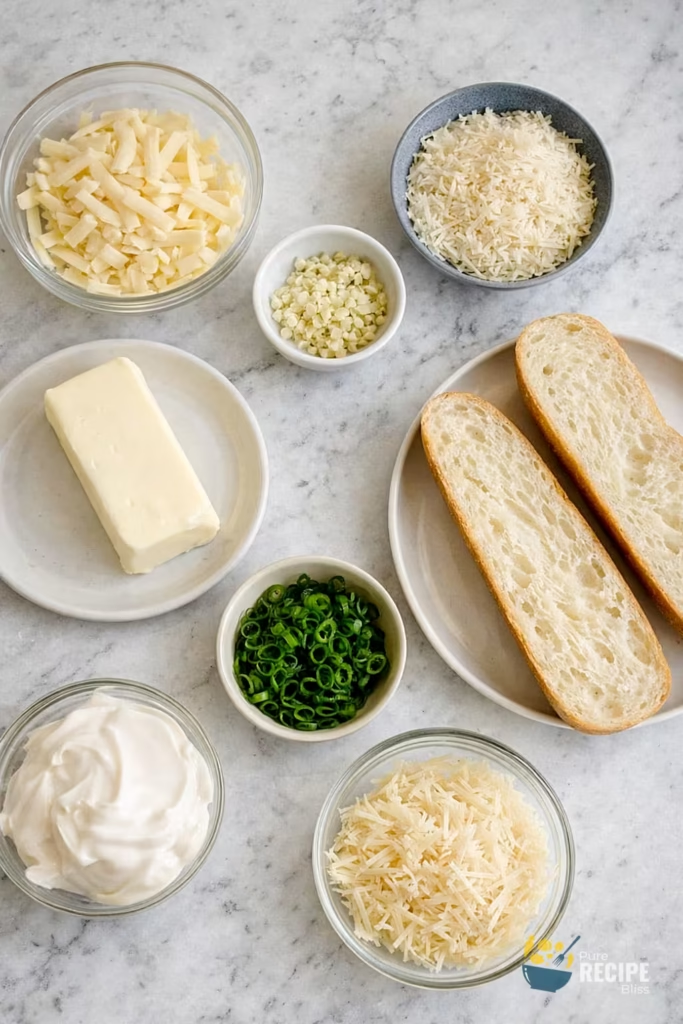
- Butter: You’ll need softened butter because it mixes more easily with the other ingredients, and it helps the bread get that rich flavor.
- Asiago cheese: This cheese adds a nutty taste, and I like using it because it balances the creaminess of the mayo.
- Monterey Jack cheese: It melts smoothly and gives that stretchy pull, which makes the bread more fun to eat.
- Mayonnaise: This is the ingredient that makes the spread creamy, and it also helps the cheese stick better to the bread.
- Scallions: These add a mild onion flavor and a bit of color, so the bread doesn’t look too plain.
- Garlic: Fresh garlic gives a stronger flavor than garlic powder, and I usually mince it finely so it blends well.
- French bread: A sturdy loaf works best because it holds the topping without getting soggy, and it still has a soft inside.
- Home tip: I once tried using pre‑shredded cheese, but it didn’t melt as nicely, so now I always shred it myself.
💡 Note: For the full ingredient list with exact amounts and measurements, please check the recipe card below.
Step-By-Step Instructions to Make Creamy Cheesy Garlic Bread:
Before I go into the steps, I’ll share one small thing I learned while making this at home. The first time I tried it, I spread the mixture too lightly and the bread ended up tasting dry. Since then, I always make sure to cover the bread all the way to the edges so every bite has flavor.
Step 1: Mix the spread
Start by combining the softened butter, cheeses, mayonnaise, scallions, and garlic in a bowl. I usually mash the butter first with a fork because it blends more smoothly with the rest. The mixture should look creamy and thick, not runny.
Step 2: Slice the bread
Take your loaf of French bread and cut it lengthwise. If the bread feels too soft, I sometimes chill it in the freezer for a few minutes so the knife goes through cleanly. You want two sturdy halves that can hold the topping.
Step 3: Spread generously
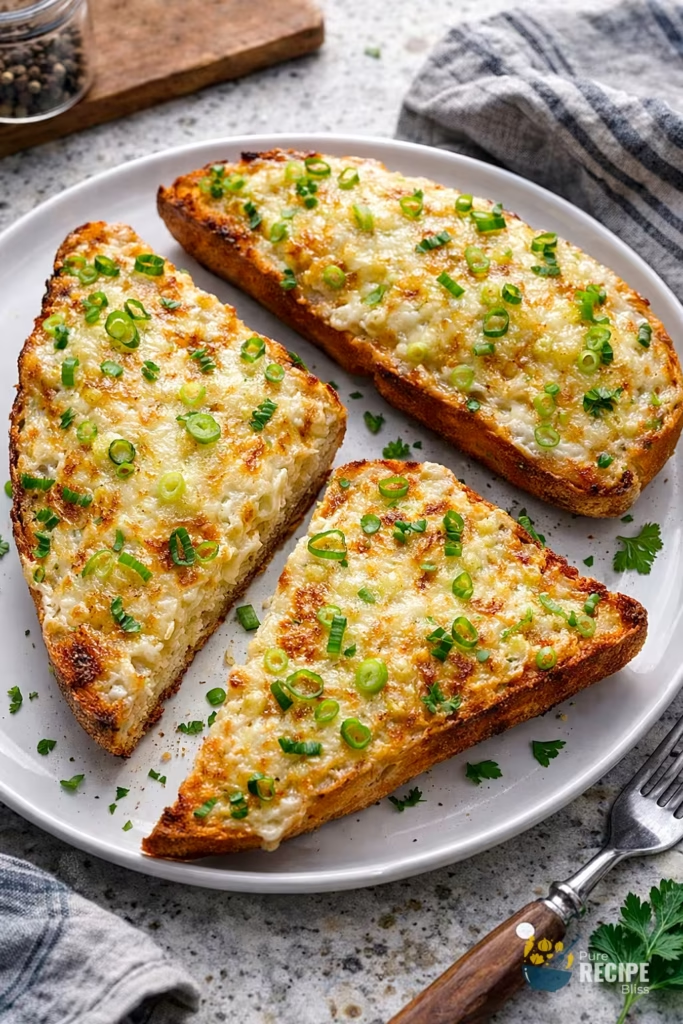
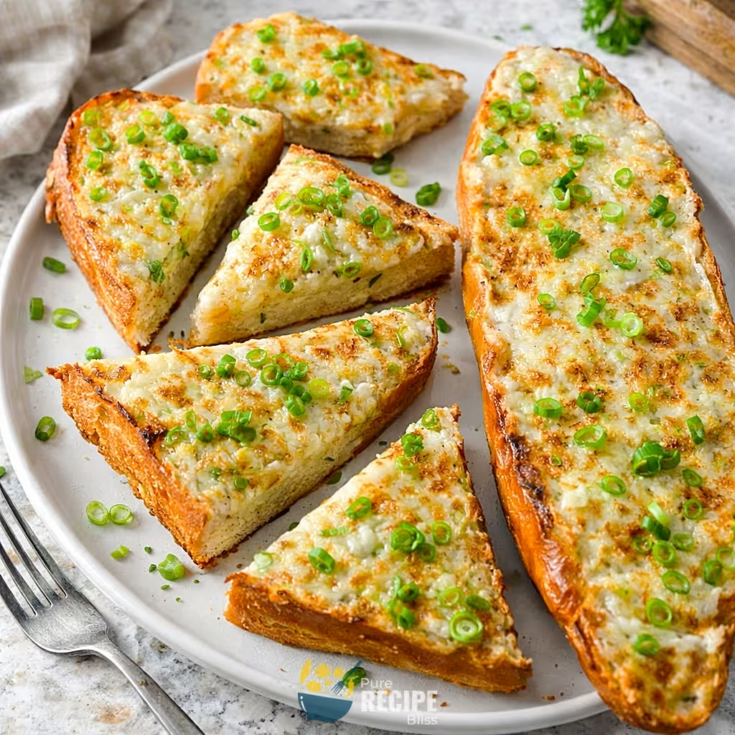
Cover each half of the bread with the mixture, making sure to go all the way to the edges. If you leave gaps, those bites will taste plain. The topping should sit thick enough that you can see the cheese pieces.
Step 4: Bake and broil
Place the bread in the oven to bake until the cheese starts melting, then switch to broil for a short time. Keep an eye on it because the top browns quickly. You’re looking for golden edges and gooey cheese that bubbles slightly.
Step 5: Slice and serve
Once it’s out, let it cool for a minute so the topping sets a little. Then slice it with a serrated knife using a gentle sawing motion. The inside should stay soft while the top is crisp.
Home tip: I once reheated leftovers in the microwave and the bread turned soggy, so now I always use the toaster oven. It keeps the edges crisp and the cheese melty without turning greasy.
💡 Note: These steps are just an overview. For detailed quantities, measurements, and exact timings to make this recipe, please check the recipe card below.
Helpful Tips For The Best Results:
- Texture matters: Make sure the butter is softened but not melted, because melted butter makes the spread too runny and it doesn’t sit well on the bread.
- Watch the heat: The broiler browns the top very quickly, so I always keep the oven light on and stay nearby. If you step away, the edges can burn before you notice.
- Cheese choice: Shredding cheese yourself works better than using pre‑shredded, since it melts more smoothly and avoids that grainy texture.
- Garlic balance: Fresh garlic gives a stronger flavor, but if you add too much, it can overpower the bread. I usually stick to a moderate amount and mince it finely.
- Swap tip: If you don’t have scallions, you can use chives or even a little parsley. It changes the flavor slightly but still adds freshness and color.
Tasty Variations to Try:
- Extra cheesy: Add mozzarella for more stretch, or parmesan for a sharper bite.
- Herb twist: Mix in dried oregano or basil with the spread to give it a more Italian flavor.
- Spicy kick: Sprinkle red pepper flakes or add a little chopped jalapeño for heat.
- Seasonal option: In summer, I like adding fresh tomatoes on top after baking, which makes it feel lighter.
- Dietary swap: If you want it less rich, you can replace part of the mayo with Greek yogurt. It still gives creaminess but with a tangier taste.
- Garlic lovers: Roast the garlic first instead of using raw. It makes the flavor sweeter and less sharp, which some people prefer.
Serving Suggestions:
1. Serve with pasta:
Cheesy Garlic Bread pairs well with spaghetti, lasagna, or baked penne because the creamy topping balances the tomato sauce.
2. Perfect for soup nights:
It goes nicely with tomato soup or creamy vegetable soups, since the bread can be dipped without falling apart.
3. Pairs well with salads:
A crisp Caesar or kale salad works as a lighter side, and the bread makes the meal feel more filling.
4. Snack option:
Slice it smaller and serve as finger food at gatherings; it disappears quickly when people are chatting and snacking.
5. Family dinners:
Place it on the table with roasted chicken or grilled meats, and it adds a comforting touch without much effort.
Storage & Reheating Tips:
- How long it keeps: Cheesy Garlic Bread stays good for about three days if you keep it in the fridge. After that, the texture starts to change and the bread feels too soft.
- Best storage method: Place the slices in an airtight container or wrap them tightly in foil. This keeps the topping from drying out and helps the bread stay fresh.
- Simple reheating advice: I always use the oven or toaster oven because it brings back the crisp edges and melty cheese. The microwave works, but it makes the bread soggy, so I avoid it.
Home tip: If you want to reheat just one slice, the toaster oven is quicker and keeps the flavor better than reheating the whole batch.
Frequently Asked Questions (FAQ):
-
Can I use different cheeses?
Yes, you can swap Asiago or Monterey Jack with mozzarella or parmesan. Just keep in mind that softer cheeses melt faster, while harder ones give a sharper flavor.
-
Can I make Cheesy Garlic Bread ahead of time?
You can prepare the spread and keep it in the fridge, then add it to the bread right before baking. This way, the bread doesn’t get soggy while waiting.
-
Why does my bread turn out too soft?
If the loaf is very fresh, it can feel too delicate. I sometimes chill it briefly before slicing so it holds up better under the topping.
-
Is there a lighter option?
You can replace part of the mayonnaise with Greek yogurt. It still gives creaminess but with less richness, which some people prefer.
-
Can I use garlic powder instead of fresh garlic?
Yes, but the flavor is milder. I usually add a little extra powder if I don’t have fresh cloves on hand.
Cheesy Garlic Bread
Cheesy Garlic Bread is a creamy, cheesy twist on the classic garlic bread. It’s quick to prepare, easy to bake, and works well as a side dish for pasta, soups, or even as a snack to share.
Ingredients
- 2 cloves garlic, minced
- ½ cup unsalted butter, softened
- ⅔ cup mayonnaise
- ⅔ cup shredded Monterey Jack cheese
- ⅔ cup shredded Asiago cheese
- ½ cup sliced scallions
- 1 loaf French bread
Instructions
- Preheat oven to 350°F.
- In a medium bowl, combine ½ cup softened butter, ⅔ cup mayonnaise, ⅔ cup shredded Monterey Jack cheese, ⅔ cup shredded Asiago cheese, ½ cup sliced scallions, and 2 minced garlic cloves. Mix until creamy and well blended.
- Slice 1 loaf of French bread lengthwise using a serrated knife.
- Spread the mixture evenly over both halves of the bread, making sure to cover edge to edge.
- Place the bread halves on a baking sheet lined with parchment paper.
- Bake for about 7 minutes until the cheese begins to melt.
- Switch to broil and cook for about 3 minutes until the top is golden and bubbly.
- Remove from oven, let rest for 5 minutes, then slice into portions and serve warm.
Notes
Nutrition Information
Yield 10 Serving Size 1 sliceAmount Per Serving Calories 316Total Fat 31gSaturated Fat 12gTrans Fat 0gUnsaturated Fat 19gCholesterol 50mgSodium 444mgCarbohydrates 10gNet Carbohydrates 9.5gFiber 0.5gSugar 1gProtein 6g