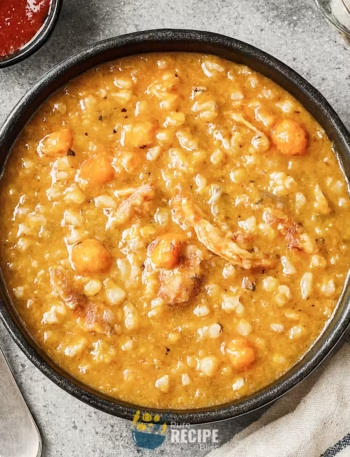
This Instant Pot Chili is basically a hearty beef and beans stew that comes together with lots of flavor, and it is made in the pressure cooker which makes the whole process much quicker than the usual stovetop way.
And because it cooks in under an hour, it feels really easy to fit into a busy day without too much effort. You can think of it as one of those comforting dishes that works best for lunch or dinner, especially on cooler days when you want something filling and warm.
It is not really a breakfast or snack type of food, but more like a satisfying main meal that you can enjoy with family or even serve to friends when they come over.
What is Instant Pot Chili?
Instant Pot Chili is basically a thick and hearty stew made with ground beef, beans, tomatoes, and spices, all cooked together in the pressure cooker. It’s the kind of dish that feels really filling and comforting, especially when you want something warm and satisfying.
People usually serve it in a bowl with toppings like cheese, sour cream, or green onions, and sometimes with bread or rice on the side. Traditionally, chili has roots in Texan cooking, where some versions don’t even include beans, but this recipe is more of a modern take that’s easy to make at home.
It’s a popular choice for family dinners, casual get-togethers, or even chili cook-offs.
Why You’ll Love This Recipe
Quick to make: The nice thing about this Instant Pot Chili is that it cooks in under an hour, so you don’t have to spend the whole evening waiting around for dinner to be ready.
Simple ingredients: Most of the things you need are very common pantry items like beans, tomatoes, and spices, so you don’t have to go searching for anything unusual.
Beginner-friendly: Even if you don’t cook often, the step-by-step process in the Instant Pot makes it easy to follow without feeling complicated.
Comforting meal: Because it’s warm, thick, and filling, it really works well as a cozy dinner when you want something satisfying.
Great for gatherings: Since it makes a good amount, you can serve it to family or friends without worrying about running out of food.
Make ahead option: You can prepare it earlier in the day and then reheat it later, which makes it convenient for busy schedules.

Ingredients Needed:
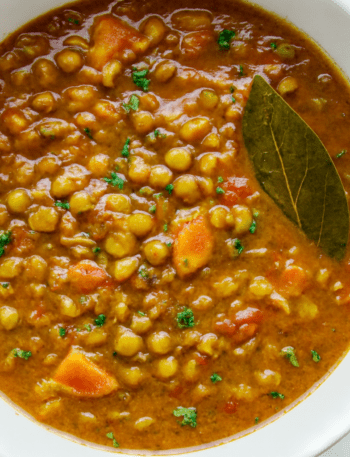
So, for this Black Chickpea Curry, you’ll be using a few simple ingredients that all work together to make the dish flavorful, filling, and comforting. Each one has its own role, and when they are cooked together, they create that balanced taste that makes the curry enjoyable.
- Black chickpeas – give the curry its main body and make it hearty and protein-rich.
- Onion – adds sweetness and depth to the base of the curry.
- Garlic and ginger – bring sharpness and warmth that balance the heavier flavors.
- Tomatoes – create the sauce and add a tangy note to the dish.
- Spices like cumin, coriander, and turmeric – build the earthy and aromatic flavor that defines the curry.
- Chili powder – adds heat and makes the curry more lively.
- Oil or ghee – helps with cooking and adds richness to the overall taste.
- Salt and pepper – season the curry and balance all the flavors.
- Fresh cilantro – used at the end for freshness and a little brightness.
You’ll find the full ingredient list with exact quantities in the recipe card below.
Step-By-Step Instructions to Make Instant Pot Chili:
Step 1: Brown the Ground Beef

Start by turning on the sauté function in the Instant Pot and let the pot heat up until it feels hot enough to sear. Add a little oil and then put in the ground beef. As the beef cooks, it will release some liquid, so you can scoop that out and keep it aside for later. Keep stirring every now and then until the beef looks browned and slightly crisp around the edges. The smell should be savory and rich, and the meat should no longer look pink.
Step 2: Mix the Flavor Base
While the beef is cooking, you can prepare a quick mixture with stock, soy sauce, fish sauce, and cocoa powder. This mixture is what gives the chili its deep umami taste. Stir it well so everything blends smoothly, and it should look like a thin sauce with a dark color.
Step 3: Sauté Onion, Garlic, and Spices

Next, add the diced onion and minced garlic into the pot with the beef. Sprinkle in cumin, chili powder, and oregano. Stir everything together until the onions soften and the spices smell fragrant. The mixture should look glossy and slightly thick as the spices coat the beef.
Step 4: Deglaze the Pot

Pour in a bit of the flavor base you mixed earlier and use a wooden spoon to scrape the bottom of the pot. This helps loosen all the browned bits stuck to the surface, which adds extra flavor to the chili. The liquid should look darker as it picks up those bits.
Step 5: Pressure Cook the Chili

Add the reserved beef liquid back into the pot, then pour in the rest of the flavor base. Stir in the beans so they mix evenly with the beef. Finally, add tomato paste and crushed tomatoes on top but don’t stir them in. Close the lid and set the Instant Pot to cook under pressure. The mixture will thicken as it cooks, and the smell will become stronger and richer.
Step 6: Reduce and Season

Once the pressure cooking is done, open the lid carefully. If the chili looks too thin, you can switch back to sauté mode and let it simmer for a few minutes until it thickens. Taste the chili and adjust with sugar, salt, or pepper. If you like, add a splash of vinegar to brighten the flavor. The sauce should look glossy and cling to the beef and beans.
Step 7: Serve and Garnish
Spoon the chili into bowls and add toppings like sour cream, diced jalapeno, green onions, or shredded cheese. The garnishes make the chili look colorful and add extra flavor. Serve it with bread, rice, or even tortilla chips for a complete meal.
Helpful Tips For The Best Results
Texture control: If the chili feels too watery after cooking, you can switch on sauté mode and let it simmer uncovered for a few minutes until the sauce thickens and looks glossy.
Heat adjustment: Chili powder can vary a lot in spiciness, so it’s better to start with less and then add more later if you want extra heat.
Bean swap: If you don’t have kidney beans, you can use black beans or pinto beans, and they will still give a nice texture.
Flavor balance: A small spoon of sugar or vinegar at the end can help balance the flavors if it tastes too sharp or too salty.
Umami boost: If you don’t want to use fish sauce, you can just add a little extra soy sauce, and it will still give depth.
Tasty Variations to Try:
- Smoky flavor: Add a bit of smoked paprika or chipotle powder to give the chili a deeper, smoky taste.
- Vegetarian option: Skip the beef and use lentils or extra beans, which will still make it hearty.
- Turkey chili: Swap the ground beef for ground turkey if you want something lighter but still filling.
- Seasonal twist: In colder months, you can add diced sweet potatoes or butternut squash for extra comfort.
- Spicy version: Add fresh jalapenos or a splash of hot sauce if you like more heat.
- Cheesy topping: Stir in shredded cheddar at the end for a creamier and richer chili.
Serving Suggestions:

1. Serve with bread:
A warm slice of crusty bread or even garlic bread works really well because it helps soak up the thick chili sauce and makes the meal feel more filling.
2. Perfect for rice:
If you want something more complete, you can serve the chili over plain rice, and it balances the flavors while making it more satisfying.
3. Pairs well with toppings:
Adding sour cream, shredded cheese, or diced jalapenos on top gives extra flavor and texture, and it makes each bowl feel a little different.
4. Great for gatherings:
This chili is perfect for casual dinners with family or friends, since you can make a big batch and let everyone add their own toppings.
5. Comfort food evenings:
It works best for lunch or dinner on cooler days when you want something hearty and warm.
Storage & Reheating:
- How long it keeps: The chili stays good in the fridge for a few days, usually around three to four, and the flavor often gets even better the next day.
- Best storage method: Place it in an airtight container once it has cooled down, because that helps keep the texture and taste fresh.
- Simple reheating advice: Warm it up on the stove or in the microwave, and if it looks too thick, just add a splash of stock or water to loosen it.
Frequently Asked Questions (FAQ):
-
Can I substitute the beef?
Yes, you can easily swap the ground beef for ground turkey or chicken if you want something lighter, and the recipe will still turn out hearty.
-
Can I make it ahead of time?
Yes, the chili actually tastes better the next day, so you can cook it earlier and just reheat when you are ready to serve.
-
What if the texture feels too thin?
If the chili looks watery, you can simmer it on sauté mode for a few minutes until it thickens.
-
Can I skip the beans?
Yes, if you prefer a bean-free version, you can leave them out, though the chili will be less filling.
-
Is it suitable for special diets?
You can make it vegetarian by using lentils or extra beans instead of meat, and it still works well.

Instant Pot Chili
Description
This Instant Pot Chili is a hearty beef and beans stew cooked quickly in the pressure cooker. It’s loaded with layers of umami and spice, making it perfect for cozy dinners or casual gatherings. Easy enough for weeknights yet flavorful enough to impress guests, this chili is filling, satisfying, and great for cold weather comfort food.
Ingredients
Umami Stock Mixture:
Optional Garnish:
Instructions
- Turn on Instant Pot to Sauté More function. Add 1 tablespoon (15 ml) olive oil and let it heat until hot.
- Add 1 – 1 ½ pounds ground beef, season with kosher salt and freshly ground black pepper, and cook until browned and slightly crisp. After about 5 minutes, remove excess liquid and reserve in a small bowl.
- While beef cooks, mix 1 cup (250 ml) unsalted chicken stock, 2 tablespoons (30 ml) fish sauce, 1 tablespoon (15 ml) soy sauce, and 1 teaspoon (2.5 g) unsweetened cocoa powder in a measuring cup.
- Add 1 medium diced onion, 4 minced garlic cloves, 1 tablespoon ground cumin seed, 1-2 tablespoons chili powder (adjust to taste), and 1 teaspoon dried oregano to the beef. Sauté for about 5 minutes until onions soften and spices smell fragrant.
- Pour in ½ cup (125 ml) of the stock mixture and scrape the bottom of the pot to deglaze. Mix well until the brown bits dissolve into the liquid.
- Add the reserved beef liquid back, then pour in the remaining stock mixture. Stir in 2 cans (19 oz / 540 ml each) red kidney beans, drained and rinsed. Add 3 tablespoons (49 g) tomato paste and 1 can (28 oz) crushed tomatoes with juice on top. Do not stir after adding tomatoes.
- Close lid, set vent to sealing, and cook on High Pressure for 10 minutes. Allow natural release before opening the lid carefully.
- Stir the chili. If it looks thin, simmer on sauté mode for a few minutes until thickened. Taste and adjust with 1 tablespoon brown sugar, extra salt, and black pepper. Add 1 tablespoon apple cider vinegar if you want a tangy finish.
- Serve hot with garnishes like lime wedges, sour cream, diced jalapeno, green onions, or shredded cheddar cheese
Notes
- Adjust chili powder depending on spice level preference.
- Fish sauce adds depth but can be replaced with soy sauce if preferred.
- Chili tastes even better the next day after flavors meld together.
Nutrition Facts
Servings 6
Serving Size 1 bowl (~350 g)
- Amount Per Serving
- Calories 405kcal
- % Daily Value *
- Total Fat 19g30%
- Saturated Fat 6g30%
- Cholesterol 54mg18%
- Sodium 966mg41%
- Potassium 1172mg34%
- Total Carbohydrate 36g12%
- Dietary Fiber 11g44%
- Sugars 8g
- Protein 25g50%
- Vitamin A 814 IU
- Vitamin C 17 mg
- Calcium 116 mg
- Iron 7 mg
* Percent Daily Values are based on a 2,000‑calorie diet, and your daily needs may be higher or lower depending on your lifestyle. Nutrition information is shared only as a general estimate and may not always be fully accurate. If you follow a special diet or have specific health concerns, it’s best to check with a registered dietitian for personalized guidance.