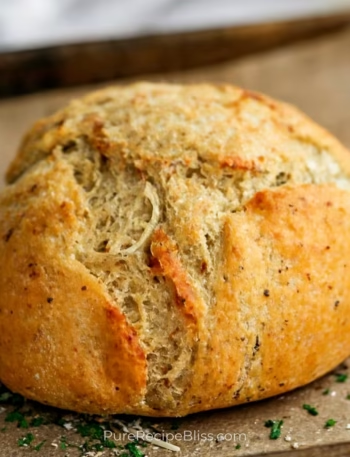
So, I’ve been making a bread at home called Italian Herbs and Cheese Bread. The nice thing about this bread is that it doesn’t take too long, and once you get the dough proofed, the rest of the steps are pretty simple.
I usually make it when I want something fresh for lunch or dinner, but honestly it works just as well for breakfast or even as a snack. The bread comes out warm and flavorful, and it feels good knowing it’s homemade. Now, let’s talk a little more about what Italian Herbs and Cheese Bread actually is.
What is Italian Herbs and Cheese Bread?
Italian Herbs and Cheese Bread is basically a soft white bread that has dried herbs mixed into the dough and then more herbs and cheese sprinkled on top before baking. The combination makes the bread smell amazing while it bakes, and the flavor is richer than plain bread because you get that cheesy, herby crust along with the fluffy inside.
Most people enjoy it as a base for sandwiches, especially subs, but it’s also really good just sliced and eaten warm with butter. It’s the kind of bread that feels familiar because it’s inspired by the one from Subway, but when you make it at home you can serve it fresh and adjust the flavor to your own taste.
Why You’ll Love This Recipe:
Let me tell you why I think you’ll really enjoy making Italian Herbs and Cheese Bread. It’s one of those recipes that feels doable even when you don’t have much time, and the results are always worth it.
- Works for different meals: I’ve served it at dinner with soup, used it for sandwiches at lunch, and even had a slice with butter for breakfast. It fits into any part of the day, which makes it really practical.
- Quick baking time: The bread only needs about twenty minutes in the oven, so once the dough is proofed you don’t have to wait long before you can enjoy it. I usually check mine after fifteen minutes because my oven tends to bake faster.
- Simple ingredients: Everything you need is easy to find in any grocery store. I like that I don’t have to search for anything special, and I can even use the herbs I already keep in my spice rack.
- Customizable flavor: You can adjust the herbs or cheese depending on what you like. I once tried adding a little extra garlic powder, and it gave the bread a stronger flavor that my family loved.
- Beginner-friendly process: The steps are straightforward, and even if you’re not used to baking bread, this one is manageable. I remember the first time I made it, I was nervous about the dough, but it turned out fine once I followed the proofing steps.

Ingredients Needed:
When I make Italian Herbs and Cheese Bread, I like to keep the ingredient list simple and clear because each one has its own role in how the bread turns out. It helps to know why you are adding something, since that makes the whole process easier to understand.
- Flour – this is the base that gives the bread its structure and makes it hold together.
- Yeast – this is what helps the dough rise and makes the bread soft and fluffy.
- Milk and water – these add moisture and help activate the yeast so the dough proofs properly.
- Sugar – this gives the yeast a little food to start working and adds a touch of sweetness.
- Salt – this balances the flavor and keeps the bread from tasting flat.
- Olive oil – this keeps the dough from sticking and adds a bit of richness.
- Parmesan and Cheddar cheese – these bring the cheesy flavor and create that golden crust on top.
- Herbs like oregano, parsley, thyme, and basil – these add aroma and flavor, making the bread taste different from plain white bread.
One thing I noticed is that using freshly grated cheese makes a big difference in flavor compared to the pre-grated kind, so I always go with fresh.
💡 Note: For the full ingredient list with exact amounts and measurements, please check the recipe card below.
Step-By-Step Instructions to Make Italian Herbs and Cheese Bread:
So, one small thing I learned while making Italian Herbs and Cheese Bread at home is that the dough feels very different depending on how much flour you add. At first I used too much and the bread came out heavy, but later I realized it’s better to stop adding flour once the dough feels soft and stretchy, even if it sticks a little to the fingers. That made the bread lighter and more enjoyable.
Step 1: Mixing the Herb and Cheese Blend
Start by combining the Parmesan with the dried herbs in a small bowl. This mixture is important because part of it goes into the dough and part of it stays for the topping. I usually stir it well so the herbs don’t clump together. The smell at this stage already gives you a hint of how the bread will taste later.
Step 2: Starting the Dough Base
In a larger bowl, add the warm milk and water, then the yeast and sugar. I like to add a little flour right after so the yeast doesn’t sit alone with the salt. This step is where the yeast starts waking up, and you’ll notice the mixture looks slightly foamy if it’s working well.
Step 3: Building the Dough
Gradually add more flour and half of the herb mixture. Keep mixing until the dough feels stretchy but not too sticky. If it’s sticking too much, sprinkle a little extra flour. I once made the mistake of adding too much flour too quickly, and the dough turned stiff, so now I go slowly.
Step 4: First Proofing
Place the dough in a greased bowl, cover it, and let it rise until it doubles in size. I usually keep it in a warm spot away from drafts. When it’s ready, the dough looks puffed up and feels airy when you press it lightly.
Step 5: Shaping the Loaves
Divide the dough into two pieces and roll them into long ropes. Place them on a baking sheet or loaf pan. I always score the tops with a sharp knife because it helps the bread bake evenly. Without scoring, the bread sometimes cracks in random spots.
Step 6: Adding Toppings and Second Proofing
Brush the loaves with milk, then sprinkle the rest of the herb mixture and Cheddar cheese on top. Let them rise again until they look fuller. This step makes the bread softer and gives the topping time to settle into the dough.
Step 7: Baking the Bread
Bake until the bread turns golden and the cheese melts into a slightly crisp crust. The smell fills the kitchen, and you’ll know it’s close to ready when the top looks browned and the cheese edges look a little crunchy. I usually tap the bottom of the loaf like if it sounds hollow, it’s baked through.
Step 8: Cooling and Serving
Transfer the bread to a cooling rack so the bottom doesn’t get soggy. Waiting is the hardest part because the aroma makes you want to cut into it right away. Once it’s cool enough to hold, slice it or tear it by hand. I like eating it warm with butter, but it’s also perfect for making subs.
💡 Note: These steps are just an overview. For detailed quantities, measurements, and exact timings to make this recipe, please check the recipe card below.
Helpful Tips For The Best Results:
- Dough texture: Make sure the dough feels soft and stretchy rather than stiff. If it sticks too much, add a little flour, but don’t overdo it because too much flour makes the bread heavy.
- Salt placement: Always add salt after some flour has already gone in. I once added salt directly to the yeast, and the dough barely rose.
- Heat control: Proofing works best in a warm but not hot spot. I sometimes use my oven with just the light on, which keeps the temperature steady.
- Cheese choice: Freshly grated cheese melts better and gives stronger flavor. Pre-grated cheese often has additives that change the texture.
- Ingredient swap: If you don’t have milk, you can use water only, but the bread will be less rich. I tried this once, and while it worked, the flavor wasn’t as full.
Tasty Variations to Try:
- Extra garlic: Add more garlic powder or even roasted garlic to the dough for a stronger flavor.
- Different cheeses: Swap Cheddar for mozzarella or Gruyere if you want a milder or nuttier taste.
- Whole wheat option: Replace part of the flour with whole wheat flour for a slightly denser but healthier loaf.
- Spicy twist: Sprinkle red pepper flakes with the herbs to give the bread a little heat.
- Seasonal herbs: In summer, I like using fresh basil or parsley instead of dried, which makes the bread taste fresher.
- Olive topping: I once added chopped olives on top with the cheese, and it gave the bread a Mediterranean flavor that worked really well.
That way, Italian Herbs and Cheese Bread doesn’t have to taste the same every time, and you can adjust it depending on what you feel like eating.
Serving Suggestions:

So, when I think about serving Italian Herbs and Cheese Bread, I usually plan around meals where a warm, cheesy loaf makes everything feel more filling. It’s flexible enough to go with different foods, so you can use it in many ways.
1. Snack option:
Sometimes I just warm a slice and spread butter or garlic butter on top. It’s quick and makes a small snack feel satisfying.
2. Serve with soups:
This bread pairs well with creamy soups or even a simple vegetable stew, because the herbs and cheese add flavor that balances the lighter dishes.
3. Perfect for sandwiches:
Slice it and use it for subs or grilled sandwiches. I once made a turkey and veggie sub with it, and it tasted much better than store bread.
4. Pairs well with pasta:
Having it on the side of pasta dishes works nicely, especially with tomato-based sauces, since the herbs in the bread match the flavors.
Storage & Reheating Tips:
- How long it keeps: The bread usually stays good for about two days at room temperature, but if your kitchen is warm or humid, it’s safer to keep it in the fridge.
- Best storage method: I like to place it in a bread box or wrap it loosely in paper, because that keeps the crust from turning soggy. In the fridge, I use an airtight container.
- Simple reheating advice: When I want to bring back the fresh-baked taste, I warm slices in the oven or air fryer for a few minutes. It makes the crust crisp again and the cheese more flavorful.
Frequently Asked Questions (FAQ):
-
Can I substitute ingredients?
Yes, you can swap Cheddar for mozzarella or even Gruyere, and you can use bread flour instead of all-purpose if you want a chewier texture.
-
Can I make it ahead?
You can prepare the dough, let it rise once, and then store it in the fridge overnight. The next day, just shape and bake.
-
Why is my bread dense?
Usually it means too much flour was added or the yeast didn’t activate properly. I learned to stop adding flour once the dough feels soft and stretchy.
-
Is it okay for dietary needs?
If you want less dairy, you can reduce the cheese or use a plant-based option. Whole wheat flour can also be mixed in for more fiber.

Italian Herbs and Cheese Bread
Description
Italian Herbs and Cheese Bread is a soft, fluffy loaf topped with a cheesy, herby crust. It’s inspired by the popular Subway bread but made at home with clean ingredients. Perfect for sandwiches, soups, or simply enjoyed warm with butter.
Ingredients
Instructions
- In a small bowl, mix ¼ cup Parmesan cheese, 2 tsp oregano, 2 tsp parsley, 1 tsp garlic powder, 1 tsp thyme, and 1 tsp basil. Set aside half for topping.
- In a large mixing bowl, combine ½ cup lukewarm milk, ½ cup lukewarm water, 1 tsp sugar, and 1 Tbsp yeast. Stir, then add 1 cup flour.
- Add 1 tsp salt and half of the herb-Parmesan mixture. Mix until combined. Gradually add the remaining 1 cup flour until dough is soft and stretchy.
- Knead on a floured surface for about 8-10 minutes, or until smooth. Place in a greased bowl with a little olive oil, cover, and let rise for 1 hour or until doubled.
- Punch down the dough, divide into 2 equal pieces, and roll into long ropes. Place on a baking sheet or loaf pan.
- Score each loaf with 4-5 cuts. Brush with 2 Tbsp milk, sprinkle the remaining herb-Parmesan mixture, and top with ½ cup grated Cheddar cheese.
- Proof again for 30 minutes in a warm oven (around 110°F).
- Bake at 400°F for 20 minutes, or until golden brown and cheese is crisp.
- Transfer to a cooling rack and let rest before slicing.
Notes
- Don’t add salt directly to yeast as it slows fermentation.
- Freshly grated cheese gives stronger flavor than pre-grated.
- Check bread at 15 minutes if your oven runs hot.
Nutrition Facts
Servings 16
Serving Size 1 slice
- Amount Per Serving
- Calories 210kcal
- % Daily Value *
- Total Fat 7g11%
- Sodium 310mg13%
- Total Carbohydrate 28g10%
- Dietary Fiber 1g4%
- Sugars 2g
- Protein 9g18%
- Vitamin A 310 IU
- Vitamin C 0.5 mg
- Calcium 110 mg
- Iron 3 mg
- Vitamin D 12 IU
* Percent Daily Values are based on a 2,000‑calorie diet, and your daily needs may be higher or lower depending on your lifestyle. Nutrition information is shared only as a general estimate and may not always be fully accurate. If you follow a special diet or have specific health concerns, it’s best to check with a registered dietitian for personalized guidance.