I’ve been trying out a few cheesecake recipes lately, and one of them really stood out because it felt refreshing without being too heavy. It’s called Lemon Blueberry Cheesecake, and I liked how simple the process was compared to other desserts I’ve made.
It doesn’t take a lot of complicated steps, and once you chill it, you can slice and serve whenever you want. I think it works best as a dessert after dinner, but I’ve also enjoyed a piece in the afternoon with coffee. That’s why I wanted to share it with you before I explain more about what Lemon Blueberry Cheesecake actually is.
What is Lemon Blueberry Cheesecake?
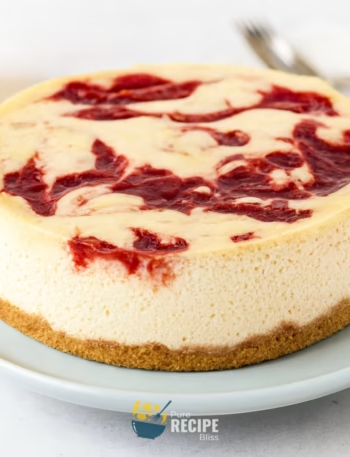
Lemon Blueberry Cheesecake is basically a baked cheesecake that has lemon mixed right into the filling and then a blueberry sauce added both inside and on top. The lemon gives it a little tart flavor while the blueberries bring sweetness and color, so every slice looks and tastes layered instead of plain.
It’s usually served chilled, and most people enjoy it as a dessert after meals, but I’ve also seen it brought out at gatherings because it slices neatly and looks nice on the table. The style is pretty classic since cheesecake and fruit are often paired together, but here the fruit isn’t just sitting on top like it’s swirled through the batter, which makes it a bit different from the usual way cheesecake is eaten.
Why You’ll Love This Recipe:
- Flavor balance: Lemon Blueberry Cheesecake has that mix of tangy lemon and sweet blueberries, so every bite feels balanced instead of heavy.
- Easy prep: Even though it looks fancy, the steps are straightforward, and once you get the crust and filling ready, the rest is mostly waiting for it to bake and chill.
- Make ahead: Since it needs chilling, you can prepare it the day before, which makes serving less stressful when you actually need it.
- Crowd appeal: I’ve noticed that people usually go for fruit cheesecakes more than plain ones, so this one tends to disappear quickly at gatherings.
- Personal note: When I tested it, I found that swirling the blueberry sauce gently gave nicer patterns, while overmixing made the whole thing look purple, so that’s something to keep in mind.
- Flexible serving: I’ve had it after dinner, but I also liked a small slice with coffee in the afternoon, so it doesn’t feel limited to one occasion.

Ingredients Needed:
- Graham cracker crumbs – they form the crust and give that crunchy base.
- Butter – it holds the crumbs together and adds flavor.
- Sugar – it sweetens both the crust and the filling.
- Cream cheese – this is the main body of the cheesecake, giving it the creamy texture.
- Eggs – they help the filling set and stay firm after baking.
- Lemon zest and juice – they bring in the tart flavor and freshness.
- Vanilla extract – it rounds out the taste and keeps the filling from being too sharp.
- Blueberries – they add sweetness, color, and the swirl pattern.
- Cornstarch – it thickens the blueberry sauce so it doesn’t run everywhere.
One small note from my side: I found that using fresh blueberries gave a nicer swirl than frozen ones, which sometimes made the sauce watery.
💡 Note: For the full ingredient list with exact amounts and measurements, please check the recipe card below.
Step-By-Step Instructions to Make Lemon Blueberry Cheesecake:
One small thing I learned while making this at home is that the blueberry sauce really changes the look depending on how much you swirl it. If you go gentle, you get nice streaks, but if you mix too much, it just turns into a purple layer. That’s why I started paying more attention to the sauce texture before adding it in.
Step 1: Prepare the Pan
Start by getting your pan ready with parchment and a light spray of oil. This makes it easier to lift the cheesecake later. I once skipped the parchment and the crust stuck badly, so now I always line it.
Step 2: Make the Crust
Mix the crumbs with melted butter and sugar until it feels like damp sand. Press it firmly into the pan so it doesn’t crumble later. I usually press a little up the sides too, because it holds the filling better.
Step 3: Mix the Cheesecake Filling
Beat the cream cheese until smooth, then add sugar and eggs slowly. Add lemon zest, juice, and vanilla. The batter should look creamy without lumps. If the cream cheese isn’t soft enough, you’ll see little bits, so I always leave mine out for a while before mixing.
Step 4: Cook the Blueberry Sauce
Cook blueberries with sugar, lemon juice, water, and cornstarch until they burst and the sauce looks glossy. Add the rest of the berries and let it thicken. I noticed that if you stop too early, the sauce runs, so wait until it coats the spoon lightly.
Step 5: Layer and Swirl
Pour half the cheesecake filling into the crust, then spoon some sauce and swirl gently with a toothpick. Add the rest of the filling and repeat with more sauce on top. I found that small circles with the toothpick gave nicer patterns than dragging it straight across.
Step 6: Bake in Water Bath
Wrap the pan in foil and place it in a larger pan with hot water halfway up the sides. This keeps the cheesecake moist and prevents cracks. The center should look slightly jiggly when it’s done, not firm like cake.
Step 7: Cool and Chill
Let the cheesecake cool in the water bath for a while, then move it to a rack until room temperature. After that, chill it in the fridge for several hours or overnight. I noticed that overnight chilling gave a smoother slice and the flavors blended better.
That’s the whole process, and once you’ve done it once, it feels less complicated the next time.
💡 Note: These steps are just an overview. For detailed quantities, measurements, and exact timings to make this recipe, please check the recipe card below.
Helpful Tips For The Best Results:
- Texture check: Make sure the cream cheese is really soft before mixing, because if it’s too firm, the batter will have little lumps that don’t go away even after baking.
- Heat control: When cooking the blueberry sauce, keep the heat steady and not too high, otherwise the berries burst too quickly and the sauce turns watery instead of glossy.
- Swirl gently: Use a toothpick or knife lightly when swirling, because if you drag too much, the cheesecake turns purple instead of having nice streaks.
- Ingredient swap: If you don’t have fresh blueberries, frozen ones can work, but I learned that thawing them first and draining extra liquid helps the sauce stay thicker.
- Cooling patience: Let the cheesecake cool slowly in the water bath before moving it, because rushing this step often leads to cracks on top.
Tasty Variations to Try:
- Strawberry twist: Swap blueberries for strawberries and keep the lemon, which gives a sweeter and slightly softer flavor.
- Raspberry version: Use raspberries instead, and you’ll get a sharper tart taste that pairs well with the lemon.
- Orange flavor: Replace lemon juice with orange juice and zest, which makes the cheesecake taste brighter but less tangy.
- Chocolate crust: Use crushed chocolate cookies instead of graham crackers for a richer base.
- Vegan option: Try dairy-free cream cheese and plant-based butter, which I tested once and it held together fine, though the texture was a little lighter.
- Seasonal idea: In winter, you can use frozen berries with a bit of extra cornstarch, while in summer fresh berries give the best swirl and color.
Serving Suggestions:

1. After dinner:
Lemon Blueberry Cheesecake is best served chilled after a meal, because the creamy texture feels lighter when paired with something savory like chicken or beef.
2. With drinks:
Serve with coffee or tea in the afternoon, since the lemon flavor works well with warm drinks and the blueberry adds a sweet balance.
3. Special occasions:
Perfect for gatherings or potlucks, because the swirl design looks nice on the table and slices hold their shape when plated.
4. Pairing idea:
Pairs well with a small scoop of vanilla ice cream or even a drizzle of extra blueberry sauce if you want more fruit flavor.
Storage & Reheating Tips:
- Fridge storage: Lemon Blueberry Cheesecake keeps well in the refrigerator for a few days if you cover it tightly. I usually place mine in a container with a lid so the crust doesn’t dry out.
- Freezer option: You can freeze slices by wrapping them in plastic and then foil. I noticed that thawing overnight in the fridge gives the best texture without making the crust soggy.
- Reheating advice: Cheesecake isn’t really reheated like regular food, but if you want it softer, you can leave a slice out at room temperature for 15-20 minutes before serving. That way, the filling feels creamier and easier to cut.
Frequently Asked Questions (FAQ):
-
Can I swap the fruit?
Yes, you can replace blueberries with raspberries or strawberries. I tried raspberries once and the flavor was sharper, but it still worked fine with the lemon.
-
Can I make it ahead?
Lemon Blueberry Cheesecake actually tastes better if chilled overnight, so preparing it the day before serving is a good idea.
-
Why is my texture off?
If the filling feels grainy, it usually means the cream cheese wasn’t softened enough. I learned to leave mine out longer before mixing.
-
Is there any dietary options?
You can use low-fat cream cheese or even plant-based cream cheese. I tested a dairy-free version once, and while it was lighter, it still held together well.
-
Do I need the water bath?
Yes, it helps prevent cracks. I once skipped it, and the top split badly, so now I always use it.

Lemon Blueberry Cheesecake
Description
Lemon Blueberry Cheesecake is a baked dessert with a buttery graham cracker crust, a creamy lemon-flavored filling, and a glossy blueberry swirl inside and on top. It’s rich yet refreshing, and works well for gatherings or family meals.
Ingredients
Instructions
- Preheat oven to 350°F and prepare a 9‑inch springform pan with parchment and nonstick spray.
- Mix 2 ⅔ cups graham cracker crumbs, ⅔ cup melted butter, and ⅓ cup sugar until evenly combined. Press firmly into pan bottom and sides, then bake for about 12 minutes until lightly set. Cool completely.
- Beat 24 ounces cream cheese with 1 ¼ cups sugar until smooth. Add 3 large eggs slowly, then mix in 3 tablespoons lemon juice, 2 tablespoons lemon zest, and 1 teaspoon vanilla extract until creamy.
- In a saucepan, cook 1 cup fresh blueberries with ⅛ cup sugar, 1 tablespoon lemon juice, 2 tablespoons water, and 1 tablespoon cornstarch until berries burst and sauce thickens glossy. Stir in the remaining ¼ cup blueberries and let cool.
- Pour half the cheesecake batter into crust. Spoon half the blueberry sauce over and swirl gently. Add remaining batter, then top with rest of sauce and swirl again.
- Wrap pan in foil, place in a roasting pan, and add hot water halfway up sides. Bake for 1 hour to 1 hour 10 minutes until center is slightly jiggly.
- Cool cheesecake in water bath for about 45 minutes, then move to rack until room temperature. Chill in fridge at least 4 hours or overnight before serving.
Notes
- Always soften cream cheese fully to avoid lumps in the batter.
- Swirl lightly for clear patterns; overmixing makes the filling turn purple.
- Overnight chilling improves texture and flavor blending.
Nutrition Facts
Servings 12
Serving Size 1 slice
- Amount Per Serving
- Calories 507kcal
- % Daily Value *
- Total Fat 33g51%
- Saturated Fat 19g95%
- Cholesterol 125mg42%
- Sodium 399mg17%
- Potassium 146mg5%
- Total Carbohydrate 49g17%
- Dietary Fiber 1g4%
- Sugars 37g
- Protein 7g15%
- Vitamin A 1145 IU
- Vitamin C 5 mg
- Calcium 82 mg
- Iron 1 mg
* Percent Daily Values are based on a 2,000‑calorie diet, and your daily needs may be higher or lower depending on your lifestyle. Nutrition information is shared only as a general estimate and may not always be fully accurate. If you follow a special diet or have specific health concerns, it’s best to check with a registered dietitian for personalized guidance.