I want to tell you about this homemade Nacho Cheese Dip because it’s one of those recipes that doesn’t take much effort at all. You can put it together quickly, usually in about fifteen minutes, and it feels nice to have something warm and cheesy ready without opening a store‑bought jar.
I usually think of it as a snack we make when we’re hanging out, but it also fits in easily at lunch or even as a topping for dinner. It’s simple, cozy, and worth knowing how to make. Next, let’s look at what Nacho Cheese Sauce actually is.
What is Nacho Cheese Dip?
Nacho Cheese Dip is basically a warm, creamy dip made from real cheese, milk, butter, and a little flour to hold it together. It’s smooth and rich, and the flavor is all about that melty cheese taste with just a touch of seasoning.
Most people enjoy it with tortilla chips, but it’s also common to spoon it over nachos, drizzle it on fries, or even use it as a topping for tacos and burgers. It’s one of those sauces that shows up at parties, game nights, or casual dinners because it’s easy to share and everyone usually likes it.
Why You’ll Love This Recipe:
- Quick to make: You don’t need much time at all because the whole process usually takes around fifteen minutes from start to finish, which makes it easy to fit in when you want something warm and cheesy without waiting too long.
- Simple ingredients: The recipe only asks for a few basic items like butter, flour, milk, and a block of cheese, so you don’t have to go searching for anything complicated or unusual.
- Easy to adjust: You can change the type of cheese depending on what flavor you like, and you can even mix two kinds together if you want a sharper or spicier taste.
- Beginner friendly: Even if you don’t cook often, the steps are straightforward, and as long as you keep whisking slowly, the sauce comes together smoothly without much stress.
- Works for different meals: It’s not just for chips because you can also use it over nachos, fries, or even as a topping for burgers or tacos, so it fits into snacks, lunch, or dinner.
Personal note: I once tried adding all the cheese at once, and it clumped badly, so now I always add it in small handfuls, and that little change makes the sauce much smoother.
Ingredients Needed:
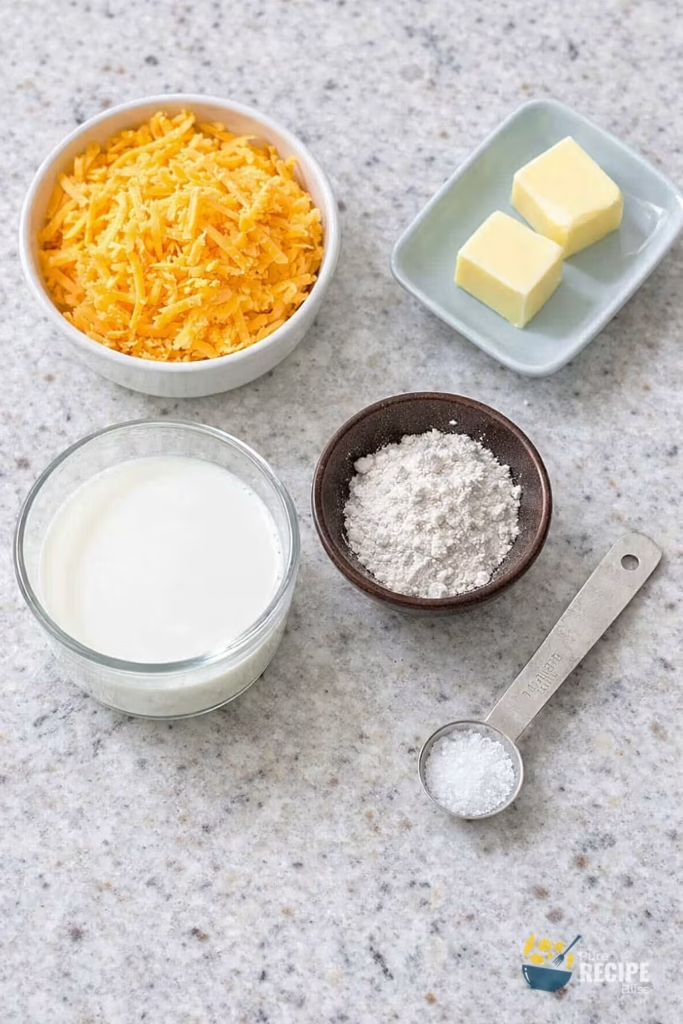
- Butter: You only need a couple of tablespoons, and it helps start the base of the sauce so everything blends together smoothly.
- Flour: A small amount of flour is added to thicken the sauce, and I’ve noticed that using regular flour works best, but a gluten‑free blend can be swapped in if needed.
- Milk: Whole milk gives the sauce a creamy texture, and I’ve found that it heats up evenly, which makes the whisking part easier.
- Cheese block: A block of Colby Jack or Monterey Jack cheese works really well, and grating it yourself makes the sauce melt better compared to pre‑shredded cheese.
- Salt and pepper: Just a pinch of each is enough to balance the flavor, and I usually taste at the end before adding more.
Personal note: I once tried mixing half cheddar and half Monterey Jack, and it gave the sauce a sharper flavor that we liked, so you can play around with combinations depending on your taste.
💡 Note: For the full ingredient list with exact amounts and measurements, please check the recipe card below.
Kitchen Gadgets & Tools You’ll Need:
- Saucepan: You’ll need a small to medium saucepan because it helps control the heat better, and it keeps the sauce from burning or sticking at the bottom.
- Whisk: A whisk is important since it keeps the butter, flour, and milk smooth, and I’ve noticed that using a whisk instead of a spoon makes the sauce lump‑free. I use this whisk for whisking.
- Cheese grater: A box grater or handheld grater works fine, and grating cheese from a block makes it melt faster and gives a creamier texture compared to pre‑shredded cheese. I use Urbanstrive’s cheese grater.
- Measuring cups and spoons: These are useful for getting the right balance of butter, flour, and milk, because even small changes can affect how thick or thin the sauce turns out. I use stainless steel ones.
- Mixing spoon or spatula: A sturdy spoon or spatula helps scrape the sides of the pan, so nothing sticks or burns while the sauce thickens.
Personal note: I once tried making Nacho Cheese Sauce without a whisk, and the lumps were hard to fix, so now I always keep one handy.
Step-By-Step Instructions to Make Nacho Cheese Dip:
Before I get into the steps, let me tell you that the sauce turns out smoother when I slow down while adding the milk. If I rush, it gets lumpy, so I always remind myself to take it easy here.
Step 1: Melt the butter
Start by melting the butter in a small saucepan over medium heat. Wait until it’s fully melted before adding anything else, because if you add flour too early, it clumps. The butter should look glossy and slightly foamy.
Step 2: Add the flour
Sprinkle the flour into the melted butter and whisk until it forms a smooth paste. It should look a little thick but not dry. If you see lumps, keep whisking until it evens out.
Step 3: Pour in the milk
Slowly pour in the milk while whisking continuously. This is the part where you want to keep the whisk moving so the sauce stays smooth. The mixture should start to look creamy and slightly thick as it heats.
Step 4: Add the cheese
Lower the heat and add the grated cheese in small handfuls. Stir gently until each handful melts before adding more. The sauce should look glossy and stretchy as the cheese blends in.
Step 5: Season and finish
Once the sauce is smooth, add a pinch of salt and pepper. Taste it before adding more, because cheese already has salt. Take the pan off the heat right away so the sauce doesn’t overcook or separate.
Personal note: I once tried dumping all the cheese in at once, and it turned into a sticky lump. Adding it slowly makes the sauce silky, and that’s the trick I always stick to now.

💡 Note: These steps are just an overview. For detailed quantities, measurements, and exact timings to make this recipe, please check the recipe card below.
Helpful Tips For The Best Results:
- Texture control: Keep whisking slowly while adding milk because this prevents lumps, and I noticed that stopping even for a few seconds makes the sauce uneven.
- Heat management: Use medium heat and lower it once the sauce starts to thicken, since too much heat can make the cheese separate and turn oily.
- Cheese choice: Always grate cheese from a block because pre‑shredded cheese has coatings that make the sauce grainy.
- Ingredient swap: If you want gluten‑free, a 1:1 flour blend works fine, though the texture may feel slightly different, but it still tastes good.
Personal note: I once reheated it too quickly and the sauce split, so now I always warm it slowly with a splash of milk.
Tasty Variations to Try:
- Spicy kick: Swap in Pepper Jack cheese or add a pinch of chili powder for extra heat.
- Cheddar blend: Mix half sharp cheddar with Monterey Jack for a stronger flavor that feels richer.
- Seasonal twist: Stir in roasted jalapeños or diced tomatoes during summer for a fresh touch.
- Dietary option: Use lactose‑free milk and butter alternatives, since many aged cheeses are naturally lactose‑free.
- Extra creamy: Add a spoonful of cream cheese while whisking for a thicker, smoother texture.
- Personal note: I once tried adding smoked paprika, and it gave the sauce a nice smoky flavor that worked really well over fries.
Serving Suggestions:
1. Serve with tortilla chips:
This sauce is most often enjoyed as a dip with crunchy tortilla chips, and it works well for casual snacking or sharing at a get‑together.
2. Perfect for nachos:
Spread it over a tray of nachos with toppings like jalapeños, beans, or salsa, and it turns into a filling meal.
3. Pairs well with fries:
Drizzle it over hot fries for a cheesy side dish that feels a little more fun than plain ketchup.
4. Great for burgers or tacos:
Use it as a topping for burgers or spoon it into tacos when you want extra flavor and creaminess.
Personal note: I once added it to baked potatoes, and it made them taste richer, so that’s another easy option.
Storage & Reheating Tips:
- How long it keeps: Nacho Cheese Sauce usually stays good for about three to four days when stored properly, so it’s best to finish it within that time.
- Best storage method: Place the sauce in an airtight container and keep it in the refrigerator, because leaving it uncovered will make it dry out quickly.
- Simple reheating advice: Warm it slowly on the stove over low heat, and add a splash of milk while whisking if it feels too thick. I avoid the microwave since it tends to separate the sauce.
Personal note: I once reheated it too fast, and the texture broke apart, so now I always take my time with gentle heat.
Frequently Asked Questions (FAQ):
-
Can I use different cheese?
Yes, you can swap in cheddar, pepper jack, or even mix two kinds together. Just make sure to grate from a block because pre‑shredded cheese doesn’t melt as smoothly.
-
Can I make it ahead of time?
You can prepare Nacho Cheese Sauce earlier in the day and store it in the fridge. Just reheat slowly on the stove with a splash of milk to bring back the creamy texture.
-
Why does my sauce turn grainy?
This usually happens if the heat is too high or if pre‑shredded cheese is used. Lowering the heat and whisking gently helps keep it smooth.
-
Is it gluten‑free or lactose‑free friendly?
Yes, you can use a gluten‑free flour blend, and lactose‑free milk works fine too. Many aged cheeses are naturally lactose‑free, so check the label before choosing.
Nacho Cheese Dip

Nacho Cheese Sauce is a smooth, creamy dip made from real cheese, milk, butter, and flour. It’s quick to prepare, ready in about 15 minutes, and works well as a snack, side, or topping for casual meals.
Ingredients
- 8 oz block Colby Jack or Monterey Jack cheese, grated
- 1 ¼ cups whole milk
- 2 tbsp unsalted butter
- 2 tbsp all‑purpose flour (or gluten‑free 1:1 blend)
- Pinch of salt
- Freshly cracked black pepper
Instructions
- Melt 2 tbsp unsalted butter in a small saucepan over medium heat until glossy and fully melted.
- Whisk in 2 tbsp all‑purpose flour until it forms a smooth paste with no lumps.
- Slowly pour in 1 ¼ cups whole milk while whisking continuously until the mixture looks creamy and begins to thicken.
- Lower the heat and add 8 oz grated cheese in small handfuls, whisking until each portion melts before adding more.
- Season with a pinch of salt and freshly cracked black pepper to taste, then remove from heat once the sauce is smooth and glossy.
- Serve immediately as a dip or topping.
Notes
Nutrition Information
Yield 4 Serving Size ½ cupAmount Per Serving Calories 334Total Fat 26gSaturated Fat 16gTrans Fat 1gUnsaturated Fat 8gCholesterol 77mgSodium 376mgCarbohydrates 8gNet Carbohydrates 7gFiber 1gSugar 4gProtein 16g
Percent Daily Values are based on a 2,000‑calorie diet, and your daily needs may be higher or lower depending on your lifestyle. Nutrition information is shared only as a general estimate and may not always be fully accurate. If you follow a special diet or have specific health concerns, it’s best to check with a registered dietitian for personalized guidance.