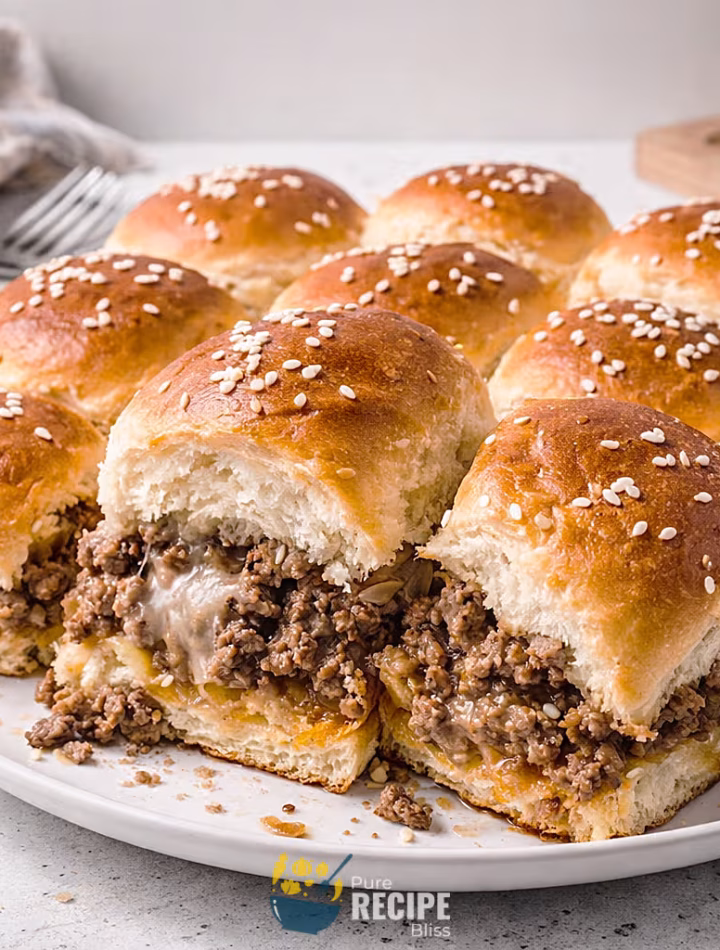
I’ve been making these Big Mac–Style Cheeseburger Sliders on Hawaiian Rolls whenever I want something quick that still feels like a treat. They don’t take long to put together, and the best part is that everything bakes in one pan, so cleanup isn’t a headache.
They’re the kind of dish I reach for when I need a simple dinner option or when friends come over and I want to serve something fun without spending hours in the kitchen. And since they’re mini, they work just as well for a casual lunch or even as a snack if you’re in the mood for something hearty.
What is Cheeseburger Sliders?
Cheeseburger sliders are basically mini burgers that are baked together in a single pan, usually using soft rolls like Hawaiian rolls. Instead of shaping individual patties, the ground beef is cooked, seasoned, and layered with cheese before being tucked inside the rolls, which makes the whole process quicker and less messy.
They’re most often served as a casual meal or snack, and they’re popular for gatherings because you can slice them apart and hand them out easily. The style is inspired by the classic fast‑food cheeseburger, but the homemade version lets you add your own touches, like extra sauce or different cheeses. It’s a fun way to enjoy the familiar burger flavor without firing up the grill.
Why You’ll Love This Recipe:
- Quick to put together: You don’t have to shape individual patties, and since everything bakes in one pan, the whole process feels faster and less stressful than making regular burgers.
- Easy cleanup: Because the sliders are assembled and baked together, you end up with fewer dishes to wash, which is always a relief after cooking.
- Kid and crowd friendly: These sliders are small enough for little hands, but they also work well when you need to feed a group without spending hours in the kitchen.
- Flexible with ingredients: You can swap cheeses, add bacon, or change the sauce depending on what you have at home, so you don’t feel stuck following one exact version.
- Great for casual meals: They fit nicely into lunch or dinner plans, and they’re especially handy when you want something filling but don’t want to fire up the grill.
Personal note: I once tried adding the sauce before baking, but it made the rolls soggy. Now I always drizzle or serve the sauce on the side, and it works much better.
Ingredients Needed:
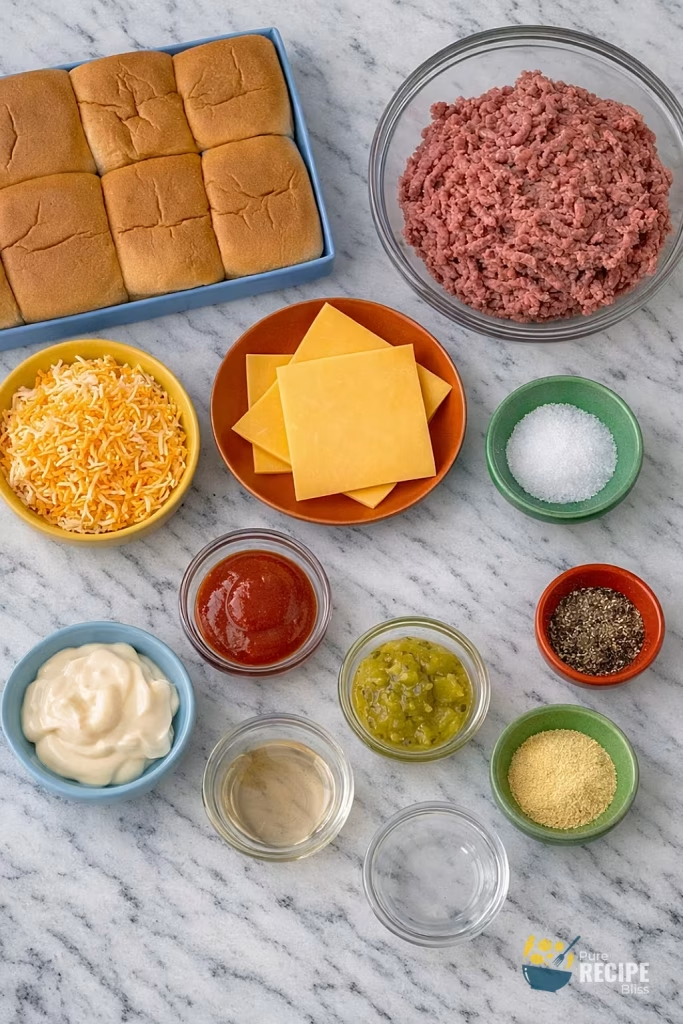
- Ground beef: You’ll want lean ground beef because it cooks cleaner and doesn’t leave too much grease. I tried using regular beef once, and the sliders turned out soggy, so draining well is important.
- Onion: A small yellow onion diced finely works best. Bigger chunks make the sliders heavy, so I always keep the pieces small.
- Seasonings: A mix of salt, garlic powder, and black pepper gives the beef enough flavor without being complicated.
- Cheese: I usually use cheddar slices for the base and Monterey Jack shredded on top. The two kinds of cheese melt differently, which makes the sliders taste better.
- Slider rolls: Hawaiian rolls are soft and slightly sweet, which balances the savory beef. You can use other rolls, but these give the best texture.
- Butter: Melted butter brushed on top helps the rolls brown nicely. I learned not to use too much, or the tops get greasy.
- Sesame seeds: Sprinkling a little on top makes them look more like classic burgers. It’s optional, but I think it adds a nice touch.
- Sauce mix: Mayo, ketchup, and relish stirred together make the special sauce. I sometimes add a pinch of paprika for extra flavor.
💡 Note: For the full ingredient list with exact amounts and measurements, please check the recipe card below.
Kitchen Gadgets & Tools You’ll Need:
- Large skillet: You’ll need a skillet big enough to cook the ground beef and onion together. I once tried using a smaller pan, and the meat kept spilling over, so a larger one makes it easier.
- Mixing spoon or spatula: A sturdy spoon or spatula helps break up the beef while it cooks. If you use something flimsy, it can bend and make the job harder. I use this spatula.
- Cutting board and knife: A small cutting board and a sharp knife are useful for dicing the onion. I learned that a dull knife makes the onion pieces uneven, which affects how they cook.
- Baking dish or sheet pan: You’ll need a rimmed baking dish or sheet pan to hold the rolls while they bake. I prefer lining it with parchment paper because it saves me from scrubbing afterward.
- Pastry brush: A brush makes it easy to spread melted butter on the tops of the rolls. I once tried using a spoon, but it didn’t coat evenly.
- Measuring cups and spoons: These help keep the sauce ingredients balanced. If you eyeball too much ketchup or mayo, the sauce can taste off. I use these measuring cups and spoons my daily cooking activity.
- Small bowl: A simple bowl is handy for mixing the sauce. I usually make it while the beef is cooking so everything comes together faster.
Step-By-Step Instructions to Make Cheeseburger Sliders:
Draining the beef really well makes a huge difference. The first time I skipped it, the rolls soaked up too much liquid and turned mushy, so now I always take the extra minute to drain. So, keep that in mind.
Step 1: Cook the beef and onion
Start by heating your skillet and adding the ground beef with the diced onion. Break the meat into small pieces as it cooks, and keep stirring until the onion softens and the beef loses its pink color. The mixture should look crumbly and smell savory.
Step 2: Season and mix in sauce base
Once the beef is cooked, drain off the extra fat. Then stir in salt, garlic powder, pepper, mayonnaise, ketchup, and relish. The mixture will look creamy and slightly glossy. Taste it here if you want to adjust the seasoning, because this is where most of the flavor comes together.
Step 3: Prepare the rolls
Slice the Hawaiian rolls horizontally so you have a top and bottom layer. Place the bottom halves in a lined baking dish. This step is easier if you use a serrated knife, because it keeps the rolls from tearing.
Step 4: Layer the cheese and beef
Lay cheddar slices evenly over the bottom rolls, then spoon the beef mixture across the cheese. Sprinkle shredded Monterey Jack on top. The cheese should cover most of the beef so it melts into the sliders.
Step 5: Add the tops and butter
Place the top halves of the rolls back on. Brush melted butter lightly across the tops, and sprinkle sesame seeds if you like. The rolls should look shiny but not soaked.
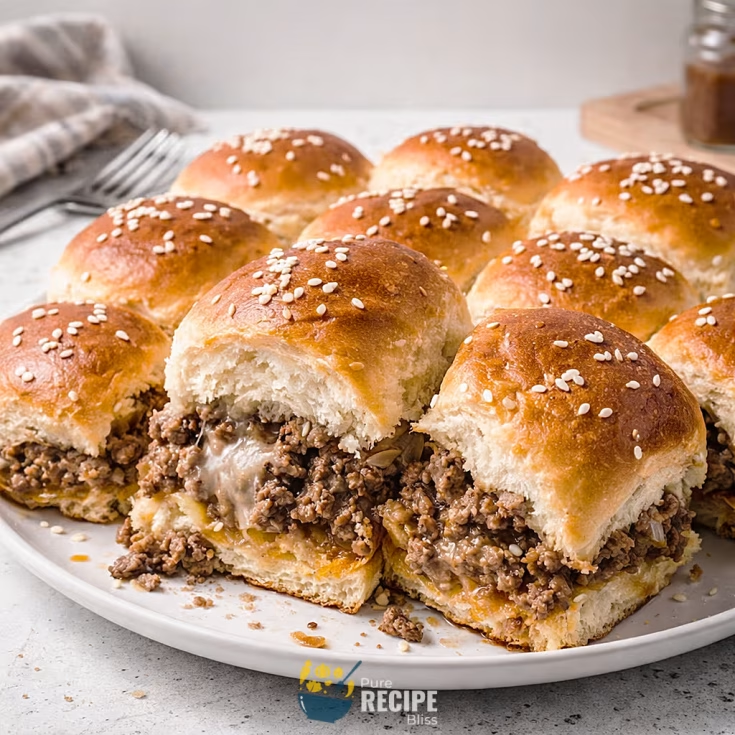
Step 6: Bake until melty and golden
Put the dish in the oven and bake until the cheese melts and the tops turn golden brown. You’ll know they’re ready when the edges look slightly crisp and the cheese starts to ooze out.
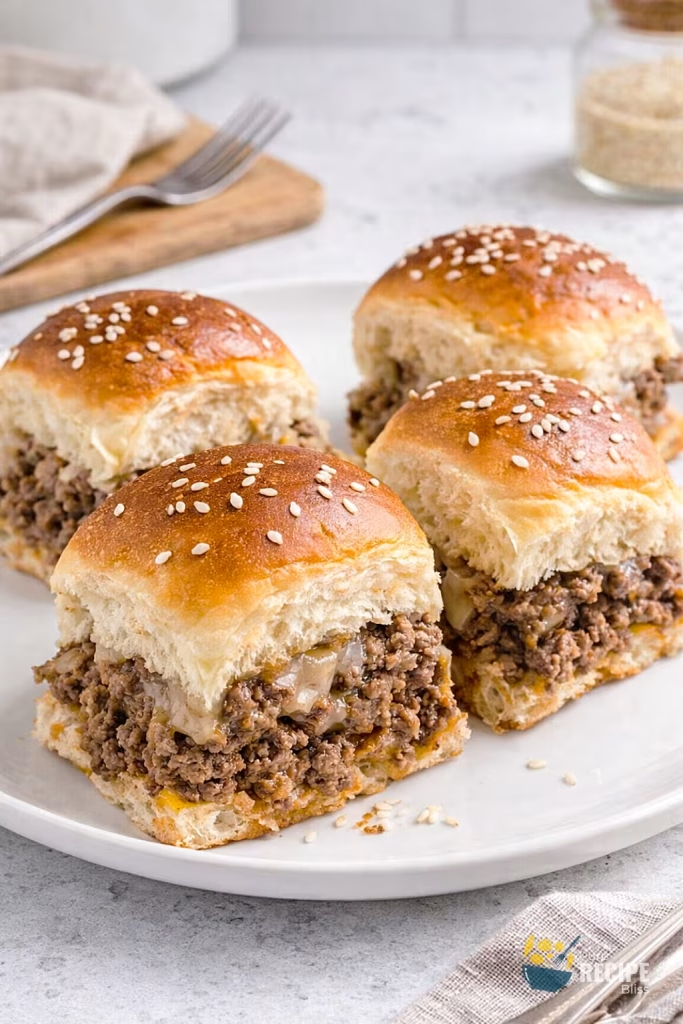
Step 7: Slice and serve
Remove from the oven, let them rest for a minute, then slice into individual sliders. Serve with the special sauce drizzled on top or on the side for dipping.
💡 Note: These steps are just an overview. For detailed quantities, measurements, and exact timings to make this recipe, please check the recipe card below.
Helpful Tips For The Best Results:
- Drain the beef well: If you leave too much liquid in the meat, the rolls soak it up and turn soggy, so it’s worth taking the time to drain properly.
- Cheese placement matters: Put slices under the beef and shredded cheese on top. This way the sliders hold together better and the cheese melts evenly.
- Watch the oven closely: The rolls can go from golden to too dark quickly, so keep an eye on them near the end instead of relying only on the timer.
- Swap onions smartly: If you don’t have fresh onion, frozen diced onion or even a little onion powder works fine. Just avoid big chunks because they make the sliders heavy.
- Butter brushing tip: Use a light hand when brushing melted butter. Too much makes the tops greasy instead of crisp.
Tasty Variations to Try:
- Add bacon: Layer cooked bacon strips under the beef for a smoky flavor.
- Spicy version: Mix in diced jalapeños or use pepper jack cheese instead of Monterey Jack.
- BBQ sliders: Swap the ketchup for barbecue sauce in the beef mixture for a sweeter, tangier taste.
- Vegetarian option: Use plant‑based ground meat and the same seasonings. It still works well with the sauce and cheese.
- Seasonal twist: In summer, add fresh tomato slices after baking. In colder months, try caramelized onions for a richer flavor.
- Pickle lovers: Add whole pickle slices on top before serving for extra crunch.
Serving Suggestions:
- When to serve: These Big Mac–Style Cheeseburger Sliders on Hawaiian Rolls are best for casual dinners, game nights, or when you want something filling but easy to share. They work well for lunch too if you’re looking for something hearty.
- Pairs well with sides: Serve with fries, potato wedges, or even a simple salad to balance the richness. I sometimes add coleslaw on the side because it gives a fresh crunch.
- Perfect for gatherings: They slice neatly into individual portions, so they’re great for parties or family get‑togethers. Pair them with extra dipping sauce or pickle slices for a fun touch.
Storage & Reheating Tips:
- How long it keeps: These Big Mac–Style Cheeseburger Sliders on Hawaiian Rolls stay good in the fridge for about three to four days. I usually keep them in a sealed container so the rolls don’t dry out.
- Best storage method: Place the sliders in an airtight container or wrap them tightly in foil. This helps keep the bread soft and prevents the cheese from hardening too much.
- Simple reheating advice: Warm them in the oven covered with foil until the cheese melts again and the rolls feel soft. I avoid microwaving because it makes the bread rubbery, so the oven works better.
Frequently Asked Questions (FAQ):
-
Can I use different meat?
Yes, you can swap ground beef for ground turkey or chicken. Just remember the flavor will be lighter, so you may want to add extra seasoning.
-
Can I make these ahead of time?
You can assemble the sliders earlier in the day, keep them covered in the fridge, and then bake right before serving. This helps when you’re planning for guests.
-
Why are my sliders soggy?
Usually it’s from not draining the beef enough. Make sure to remove the extra liquid before layering it with the rolls.
-
Can I make them vegetarian?
Yes, plant‑based ground meat works fine. I’ve tried it once, and the sauce and cheese still gave good flavor.
-
Do they freeze well?
They can be frozen after baking, but the rolls soften a lot. I prefer storing them in the fridge and reheating within a few days.
Cheeseburger Sliders on Hawaiian Rolls
These sliders are mini cheeseburgers baked on Hawaiian rolls with melty cheese and a creamy special sauce. They’re quick to prepare, easy to share, and perfect for casual dinners, parties, or game nights.
Ingredients
- 2 pounds lean ground beef
- 10 slices (8 ounces) cheddar cheese
- ⅓ cup mayonnaise
- ⅓ cup ketchup
- ⅓ cup finely diced yellow onion (about 1 small onion)
- 3 teaspoons dill pickle relish
- 4 ounces Monterey Jack cheese, shredded
- 1 teaspoon fine sea salt
- 1 teaspoon garlic powder
- 1 teaspoon ground black pepper
- 2 packages (12-count) Hawaiian rolls
- 2 tablespoons unsalted butter, melted
- 1-2 teaspoons sesame seeds
Instructions
- Preheat oven to 350°F and line a large baking dish with parchment paper.
- In a skillet, cook 2 pounds ground beef with ⅓ cup diced onion until beef is browned and onion softens. Drain excess fat completely.
- Stir in 1 teaspoon salt, 1 teaspoon garlic powder, 1 teaspoon pepper, ⅓ cup mayonnaise, ⅓ cup ketchup, and 3 teaspoons relish. Mix until creamy and glossy.
- Slice 24 Hawaiian rolls horizontally and place the bottom halves in the prepared baking dish.
- Lay 10 slices of cheddar cheese evenly over the rolls, spoon the beef mixture across, then sprinkle 4 ounces shredded Monterey Jack cheese on top.
- Place the roll tops back on, brush with 2 tablespoons melted butter, and sprinkle 1-2 teaspoons sesame seeds.
- Bake for about 15 minutes until cheese melts and tops turn golden brown.
- Remove from oven, let rest for 5 minutes, then slice into 24 sliders and serve warm with extra sauce.
Notes
Nutrition Information
Yield 24 sliders Serving Size 1 sliderAmount Per Serving Calories 194Total Fat 13gSaturated Fat 6gTrans Fat 0gUnsaturated Fat 7gCholesterol 53mgSodium 292mgCarbohydrates 3gNet Carbohydrates 3gFiber 0gSugar 1gSugar Alcohols 0gProtein 15g
Percent Daily Values are based on a 2,000‑calorie diet, and your daily needs may be higher or lower depending on your lifestyle. Nutrition information is shared only as a general estimate and may not always be fully accurate. If you follow a special diet or have specific health concerns, it’s best to check with a registered dietitian for personalized guidance.